This page contains the latest installer for all of our 3ds Max tools and technologies for PixelSquid.
The CheckMate Artist Inspection Tools allow you to pre-flight your model directly inside of 3ds Max so you can check for technical defects that would prevent your work from being accepted as part of our CheckMate catalog. Instead of having to manually review your work when you’ve completed your model, you can run these tools to check dozens of aspects of your effort, from review for overlapping faces and nGons, to stripped texture paths and object naming. With the click of a button, you’ll be able to identify any corrections needed to hit the technical aspect of the CheckMate process, whether you are looking to provide a model that is CheckMate Lite, CheckMate Pro or PixelSquid quality.
Finally, it’s worth noting that these are the same tools that the TurboSquid inspection team uses when we review a CheckMate submission. By running these tools beforehand, your inspection will take less time and you can continue to build more great model content instead of trying to fix a broken product.
v3.25
- Added support for 2019/2020
- Added support for V-Ray 4
- Added support for V-Ray Next
v3.130
- Update: Added Autodesk 3ds Max Malicious Script Issue detection system as an additional test. There is no report output in the CM Test Results page unless the test detects either of the malicious scripts, and then, it’ll pop up a dialog with that report specifically and will point the user to an Autodesk website for further assistance.
v3.110 – v3.120
- Update: Add support for Max 2017 / 2018
- Update: Add support for V-Ray 3.6 or earlier
- Update: Installer can now detect all compatible versions of 3ds Max on a user’s system so that the scripts can be installed to all selected ones in one shot
- Fix: URL Help Links for several tests updated to point to correct pages on squid.io
v2.114
- Added new Layer tests to CM Lite and CM Pro tests
- Fixed where lights and camera where 100 non scale
- Added warning for missing DLLs
- Improved Help Menus now linked to Squid.IO inline documentation
- Detects duplicate names
- Fixed r-click menus added ‘Show how to this..’
- Ignores instanced objects
- Corrected polygon count on certain models
- Corrected Total count of objects missing materials
- Fix PixelSquid materials and texture test to ignore default textures
- Fix PixelSquid materials test where textures are incorrectly reported as materials
- Ignore studio textures in texture tests
- Fix Polygon count statistics to match automation
- Missing bitmaps totals, Total Bitmap totals, Missing Textures test default Names
- Improve logging and optimize tests
- Disable additional modifiers during testing
- Fix crash while processing T-verts
- Fix Polygon count with hair/fur
v2.010
- Update lightcard texture file
v2.009
- Update animation range tests
- Update test for current Stage Studio test
- Updated for Vray 3.2 and Studio Script 3.04
- SubDs on materials now limited to 8 max
- Updated Refraction Channel Contribution to also test refraction color
- VRayFur was causing crash during test
v2.008
- HDRI files for use with PS_Studio stage setup script
- Updated error message for missing textures
- Changed texture tests to only warn when a texture is 4K or higher
- Fixed bug in stop test on error
- Fixed Diffuse Color Test in PixelSquid Stage Test
- Removed Overlap Face and Vertices tests from PixelSquid
- Update stop on error to process all test, but stop each test on first error
- Crash when studio script not run
- Removed Color Correction Test
- Studio script materials and textures omitted from tests
- Updated Studio script materials and textures omitted from tests
- Updated VRay Color Mapping Mode test for VRay 3.x
v2.000
- Added crease test from Checkmate Pro 2.0 script
- Fixed false error result in color and scale tests
- Removed Hero Delivery
- PixelSquid and CM lite polys more than 4 verts are warning, CM Pro and Hero are errors
- SpinnerCamera and SpinnerCameraTarget name no longer errors
- Turn off System Units, Display Units, Geometry Objects Only Tests, turn off all scene objects test in Pixel Squid
- Channel contribution test on reflection texture
- Texture resolution is warning in PixelSquid.
- Fixed V. Overlapping when it should be F.overlapping label
- Camera and Lights are not evaluated in individual Objects test.
- Added test for geometry not assigned to HeroObjectGroup
- Changed tests to warnings for PixelSquid Test
v1.009
- Removed Naming test for object and materials in PixelSquid
- Crash when invalid camera(s) found
- Fix false positive error on some HDRI textures
v1.008
- Render settings V-Ray Color Mapping test now supports V-Ray 2.4.03 and prior settings, VRay 2.4.04 and later versions
v1.007
- Multi-material should error and ask artists to change it to individual VRay materials
v1.006
- Removed Scale check from PixelSquid
v1.005
- Fixed duplicate structure error in Max 2014 and Max 2015
- Checkmate and Checkmate Lite tests were swapped
v1.003
- Corrected override to override in tests
- Fixed HTML output to include column names
- You can now launch test without a scene being loaded
v1.002
- Crash testing scene with XREF objects
- XREF Object(s) missing count
- XREF materials
- Title of main dialog changed to “TurboSquid Inspector”
- Current tab now highlighted
- added jump to test from “Test Results Tab”
- weird character in general Display units test
- About Box name
v1.001
- Updated exporting and load HTML reports
- Removed ngon, shadowplane tests from PixelSquid test
v1.0
- Initial Release
The CheckMate Inspection Tools and PixelSquid Studio Tools are packaged together into a single installer and are always installed together. Start by downloading the latest version of the installer using the link above, then run the executable once the download has completed.
The installer will detect the various versions of 3ds Max on your computer and present you with the option of which one to install to.
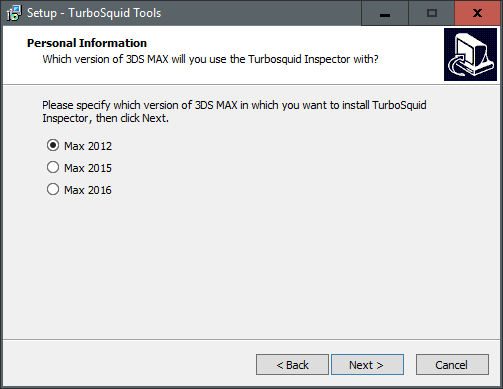
That’s all you have to select, and when you hit Next, then the installer will handle everything else.
Once installed, launch 3ds Max. You now need to run the MaxScripts first so you can add them to your interface.
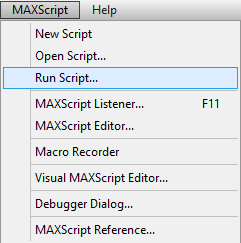
If you’re running 3ds Max 2012 – 2015, on the main 3ds Max menu, click on MaxScript -> Run Script to bring up the file selector.
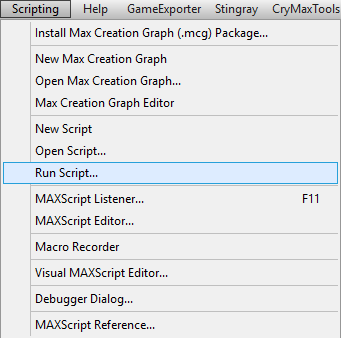
If you’re running 3ds Max 2016 or later, on the main 3ds Max menu, click on the Scripting -> Run Script to bring up the file selector.
In that dialog, navigate to your /scripts folder (it should default to it, but if not, go to your 3ds Max install location and then look for your /scripts sub-folder), and click on the two installed scripts (TS_Inspector.ms & PS_Studio.ms) one at a time.
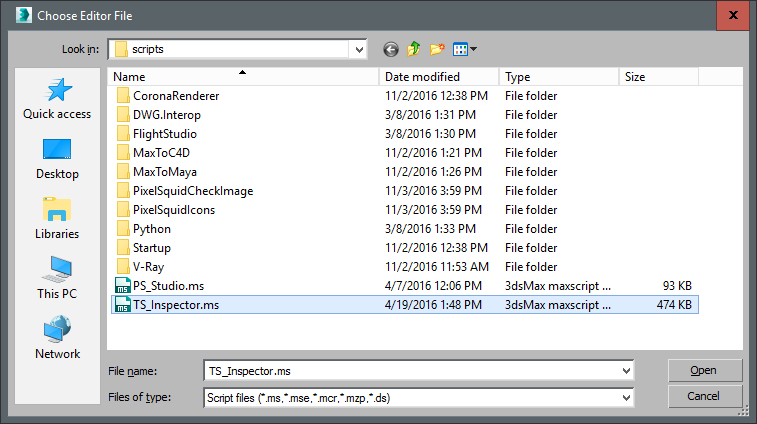
While nothing will appear to change, once this part is done, you will now be able to add these to your 3ds Max interface for easy access.
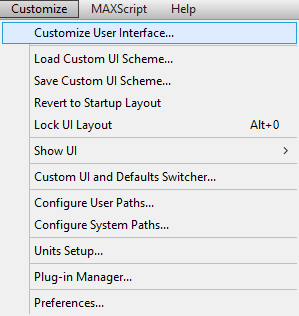
Click on the MAXScript or Scripting menu (depending on the version of 3ds Max you’re running) and click on Customize -> Customize User Interface.
Go to your Toolbars tab in the Customize User Interface dialog, then from the Categorydropdown, select TurboSquid to find the PixelSquid Studio and TurboSquid Inspector scripts. From here place the tools in a desired toolbar (or create a new one) in your 3ds Max UI for easy access.
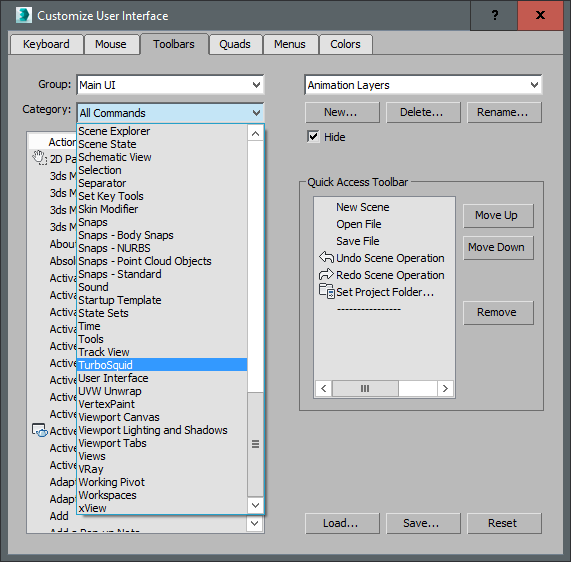
Once the TurboSquid Tools toolbar buttons are added, you are ready to start using your new CheckMate Inspection and PixelSquid Studio tools.
Important note for 3ds Max Design Users: if you are using 3ds Max Design, you must turn off the Use Real-World Scale setting in the General tab under Customize–>Preferences.
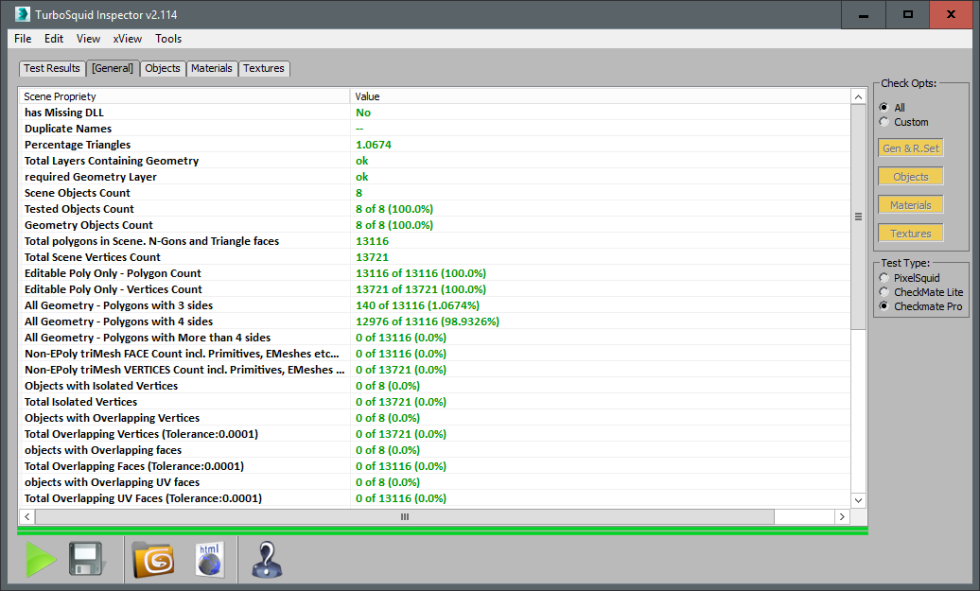
When you launch the CheckMate Inspection Script, a basic UI will load with a few simple features. For a summarized explanation, tooltips will appear when hovering the mouse cursor over the UI buttons.
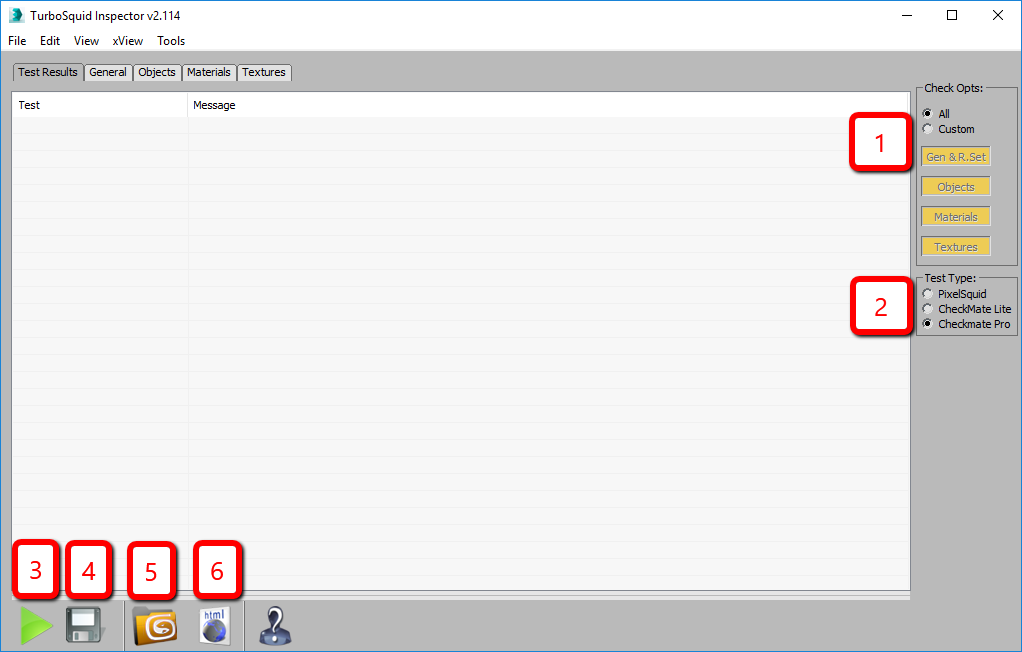 1. Check Options: By Default, the Inspection Script will review all aspects of the loaded 3ds Max scene. In selecting Custom, each test can be run individually or with any combination desired. As some tests can take a long time to run depending on the contents of your scene, we suggest that after an initial test with all options, you only re-run any individual tests that may have failed. We recommend that once done, you make a final full run using all tests to ensure all aspects show as passed.
2. Test Type: Choose the test type based on which specification you are submitting for in order to filter the tests. It is defaulted for PixelSquid , but the Inspector tool is also essential for both CheckMate Pro and Lite certifications.
3. Run Tests: Clicking on the Run Tests arrow icon will begin to process the scene for all selected Check Options. Be aware that you need to save your current scene, or load in a scene before you click this button, otherwise you’ll get a text message indicating the need to do so.
4. Save Tests HTML Report: Use this button to save an HTML file of the tool’s test results (made for easy viewing, without having to test again).
5. Open Current Scene Folder: Opens directory to location of 3ds Max file in use.
6. Open Last Saved HTML File: Click to open the most recently-saved HTML report.
Inspection Report
Once the Inspection script has been run, the results will display with categorization and color coding. Each tab displays test results for that category. You can right-click an object name in the Object test results to quickly select that object. These reports are to aid in finding errors that need correction in the scene.
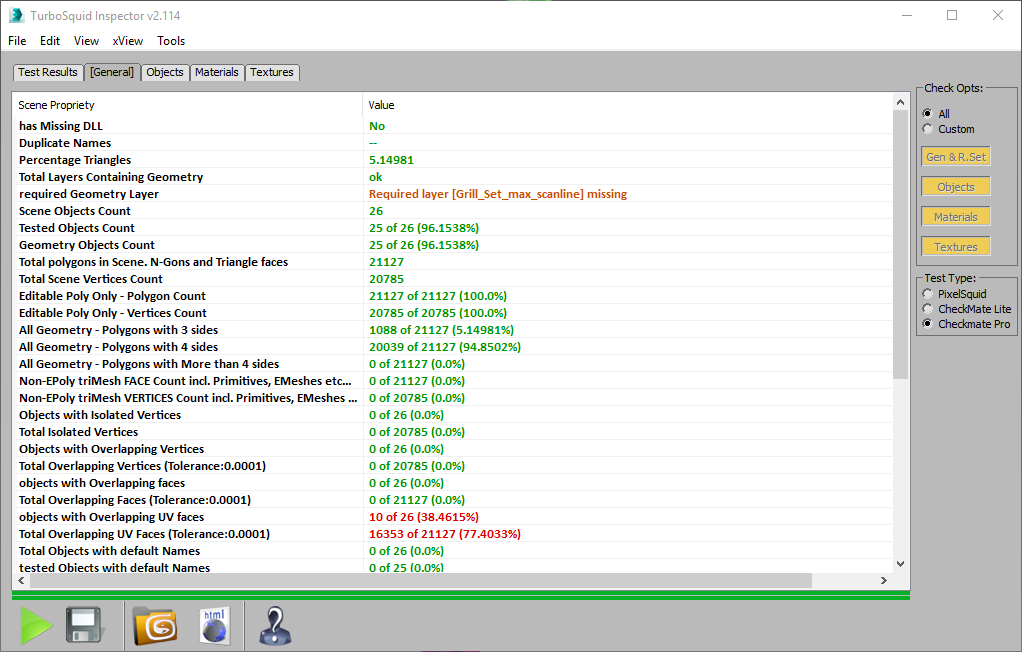
Green: This indicates that a test passed without issue. No changes are needed.
Yellow/Orange: This color code represents warnings or suggestions for problems that may be present and need to be reviewed. In general, these warnings do not affect CheckMate, but go against best modeling practices, and should be fixed and avoided in the future.
Red: Any result that shows in red indicates that the test failed and must be fixed in order to get approval for CheckMate or PixelSquid. Once updates to a model are done to correct these sorts of issues, the test in question should be re-run to ensure compliance.
If you are unsure how to fix a particular problem that has been identified on your model, you can click on many of the spec points in the Inspector Script interface and receive a pop-up dialog box which will provide options such as Learn How to Fix. And by clicking on Learn How to Fix, your Internet browser will open a new window with the appropriate Squid.io artist training article that details how to address the particular issue and why it is important for you to correct it.
Let’s say the script returns an error with your topology. If you select the Objects tab, you will see topology information for every object in the scene and errors listed in red.
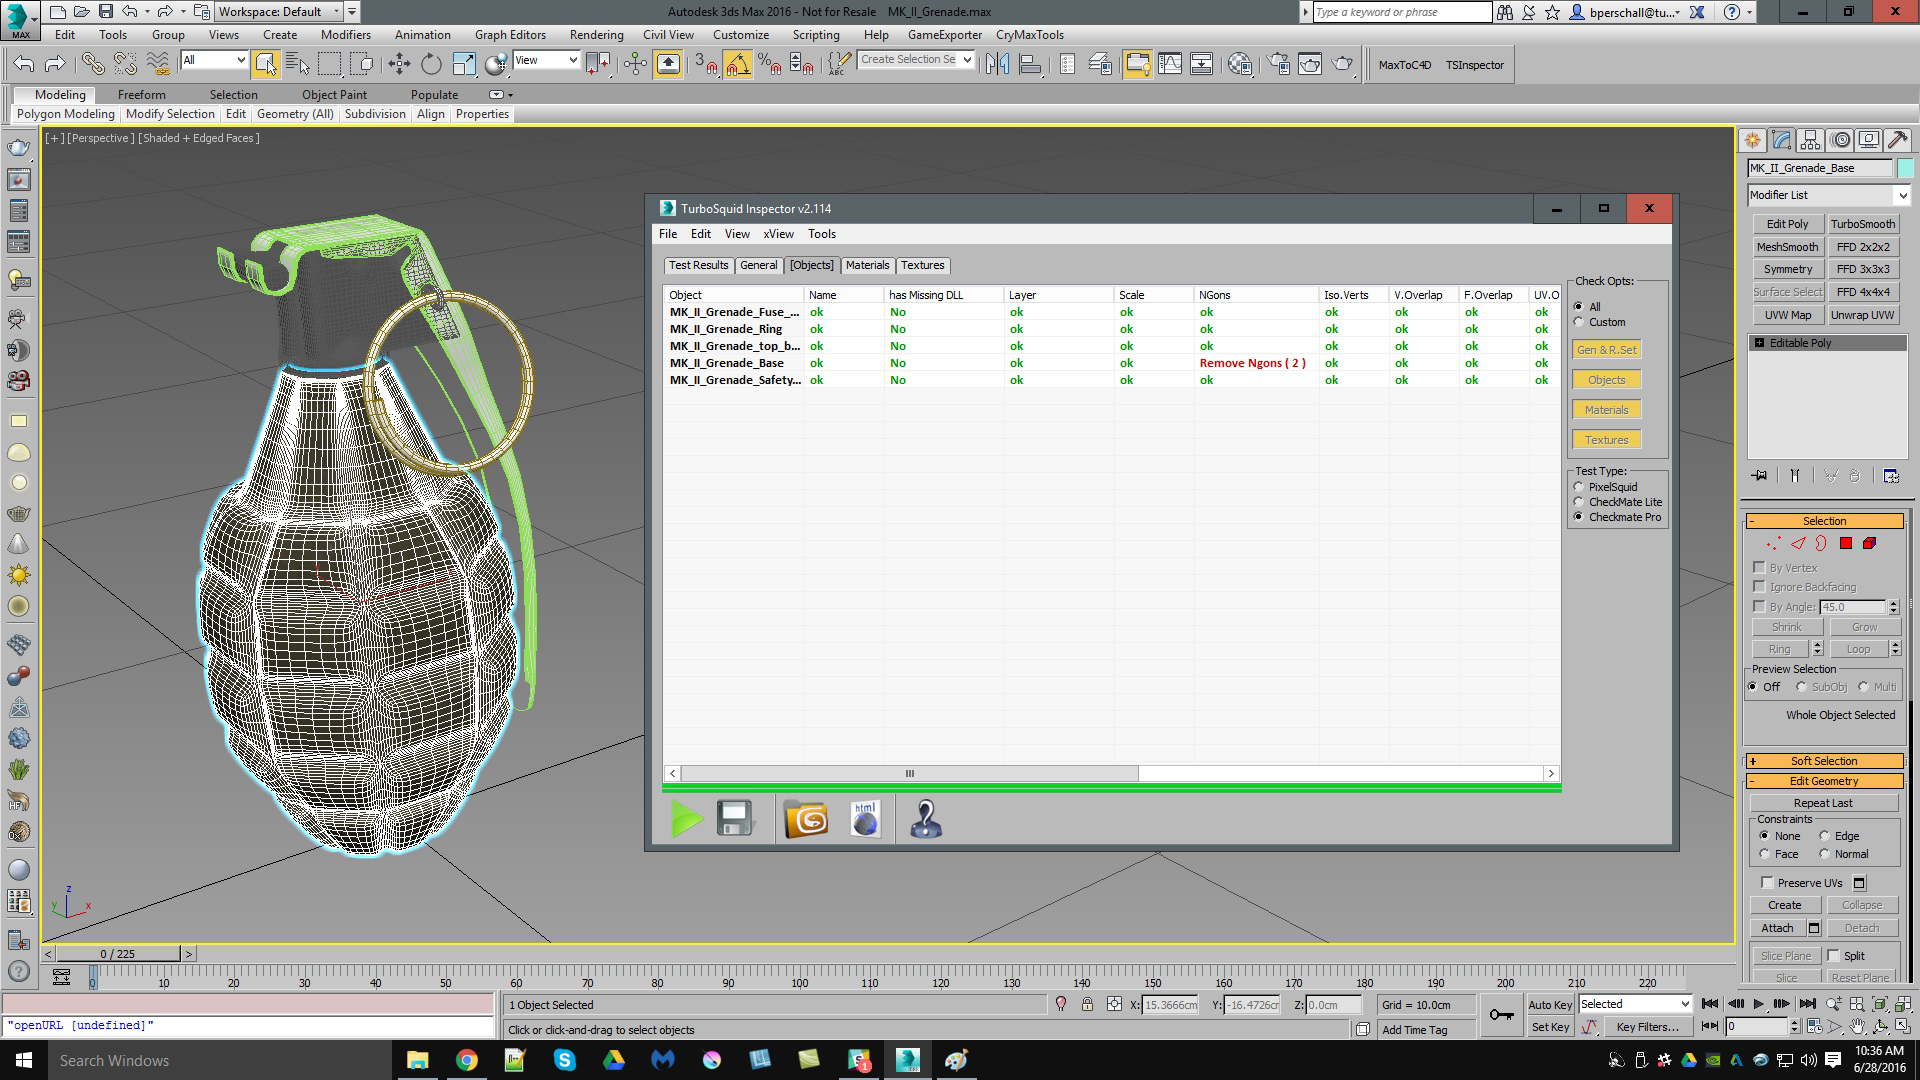
Now, when you click on the red text under the N-gons column, you’ll be presented with options to highlight different aspects of your model to help you locate the source of your problems. Since there are N-gons in this case, you can select the Select Non-Quad Polygons (5+ Sides)option to highlight all N-gons within the model. Be sure that you’re in Polygon sub-object mode in order to see the N-gons highlighted.
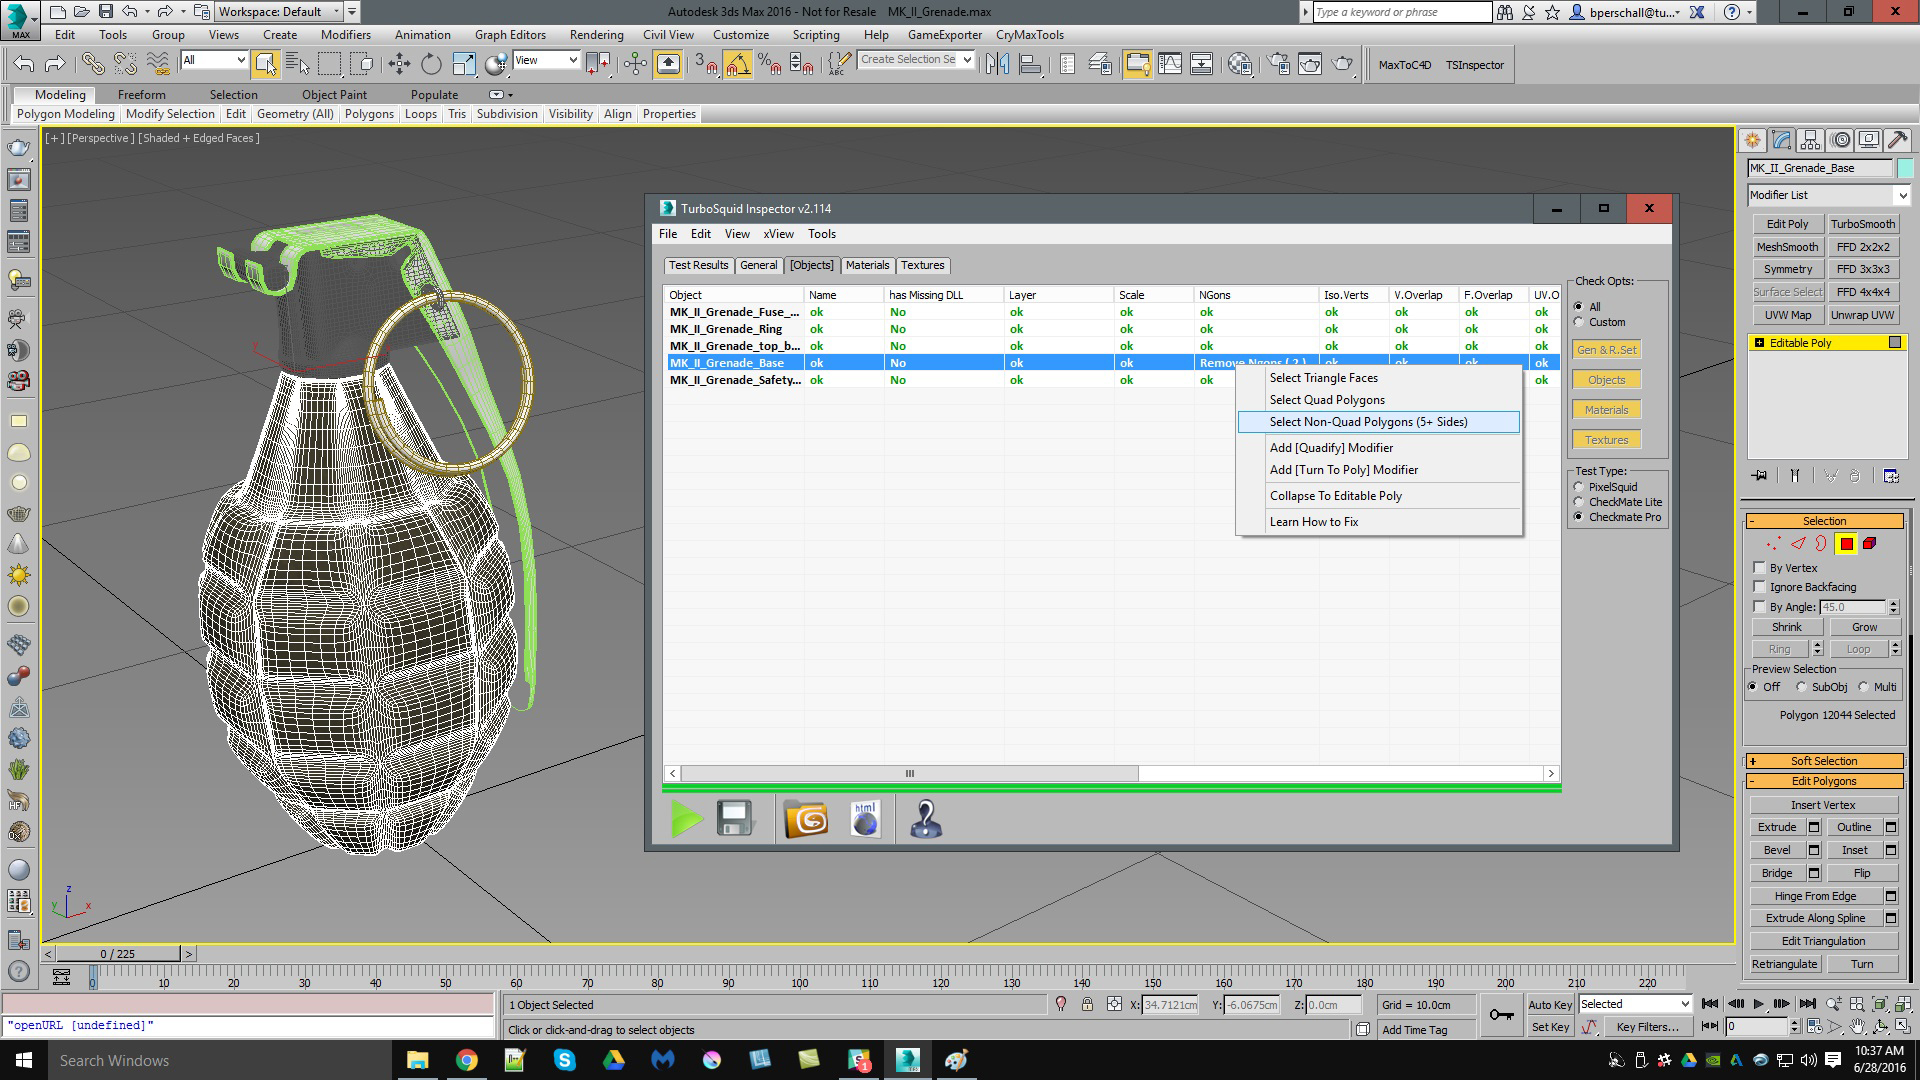
Select Quad/Tri/N-gon Faces will highlight in the viewport the specific polygons within the scene. Enable X-View will activate X-View in 3ds Max for the particular issue selected.
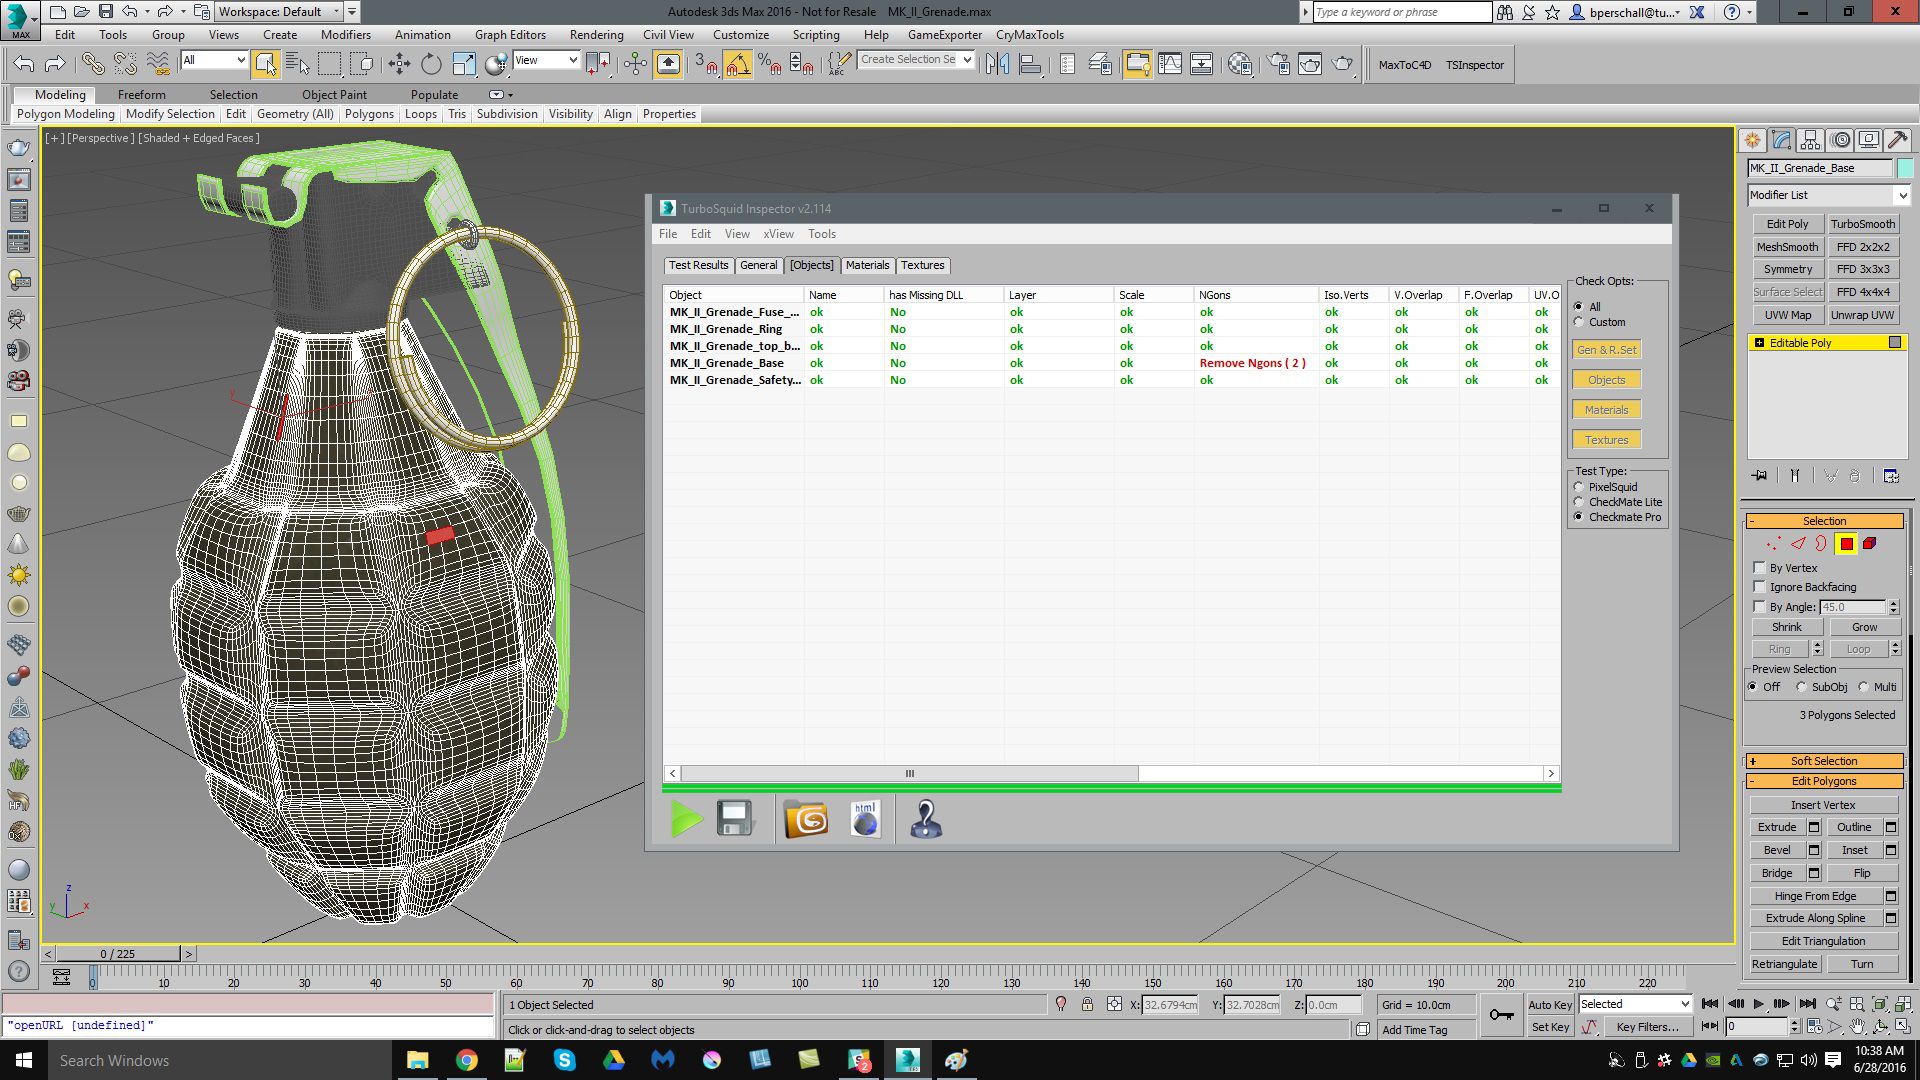
If you are familiar with removing N-gons from your model, then you know how to correct this issue. However, if you are unfamiliar with removing N-gons from a model, the CheckMate Inspection Tools also supply links to the information needed to fix the model so it meets CheckMate specifications. To access this information, click on the red Remove Ngons (#) text then choose Learn How to Fix from the pop-up dialog.
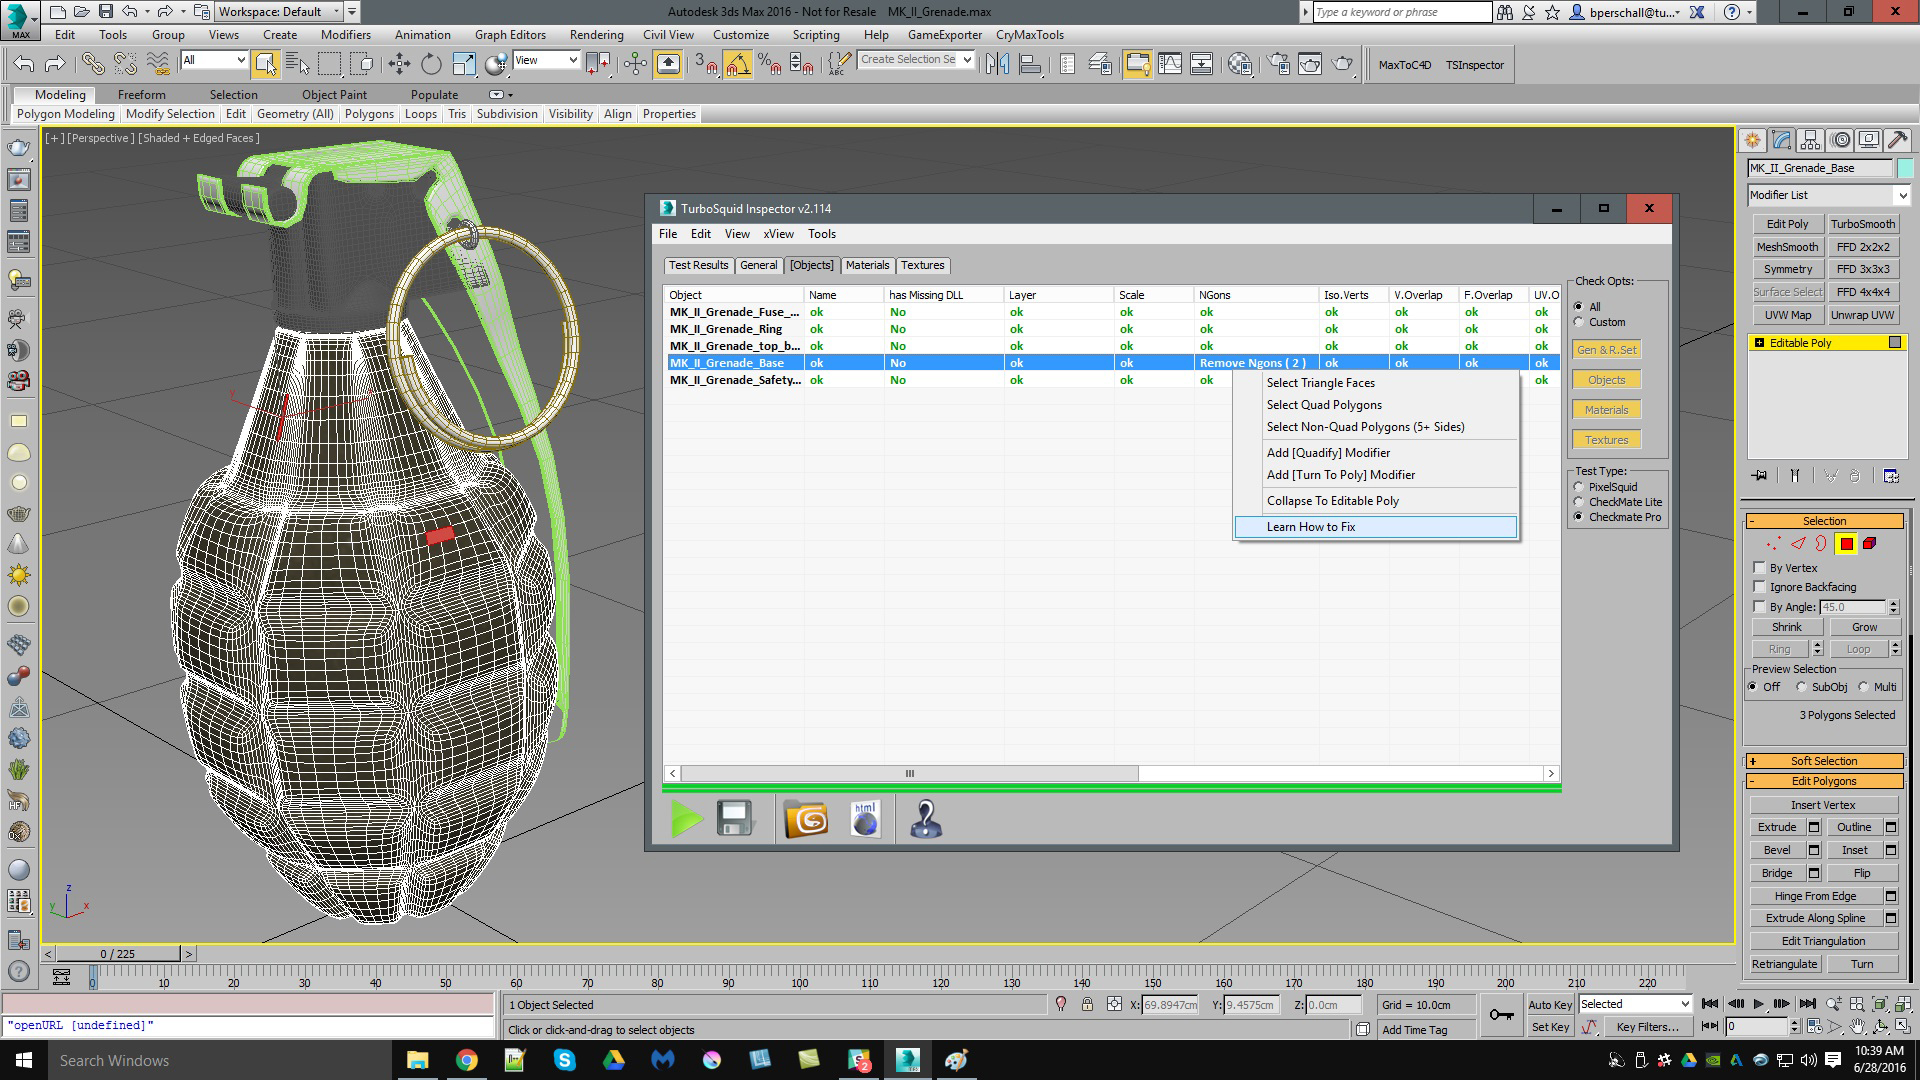
This will open a Squid.io webpage in your browser that provides methods to remove N-gons from the model. In this case, the artist is linked to a page regarding N-gons; why they are bad and how to detect them in their models.
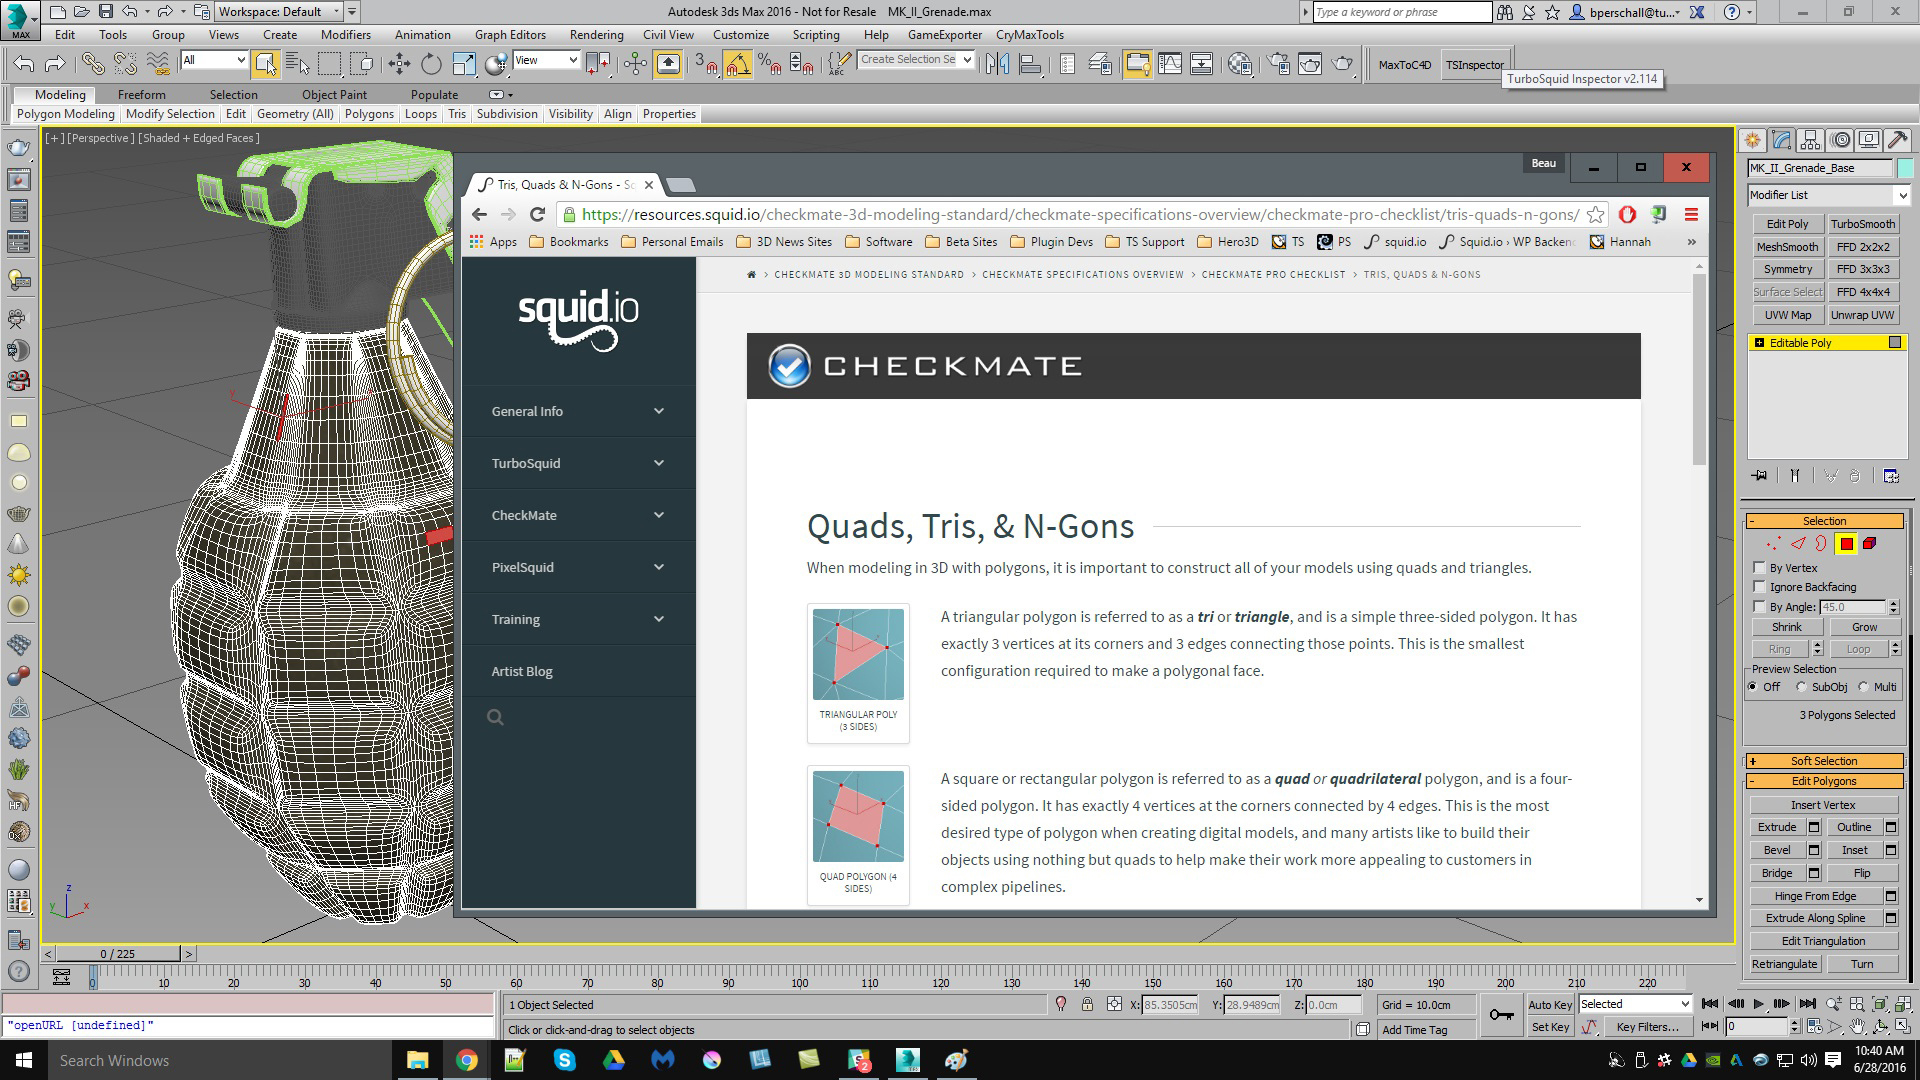
Of course, each error within the CheckMate Inspection Tools will lead you to areas within the specification or training pages so you can quickly understand how to avoid the most common problems when building your models. Ideally, these improvements will help you to quickly resolve any problems your model may contain and submit for CheckMate certification knowing that the file will pass the technical requirements.
PixelSquid Studio Tools (v3.25)
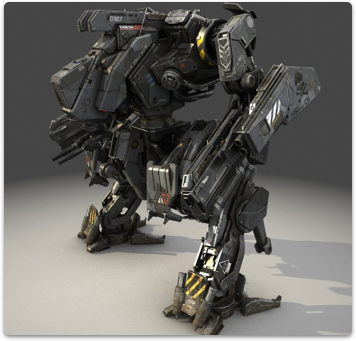
The PixelSquid Studio Tool is a scripted plug-in that will help you prepare your models for use within a PixelSquid spinner, and includes all of the proper render settings, lights and animated camera for V-Ray 2.x, 3.x, and 4.x users. It also comes with multiple calibrated HDRI image-based Studio lighting and stage rigs with different lighting conditions (interior, exterior, product shots, etc.) that not only help you ensure your models look great when submitted and rendered out for PixelSquid spinners, but also make lighting a one-click process.
v3.25
- Added support for 2019/2020
- Added support for V-Ray 4
v3.120
- V-Ray version fixes and support up to 3.60.xx
- Added Support for 3ds Max 2017 / 2018
- Included missing EXR map for light rig
v3.06
- Reactivated tool destroys previous dialog and opens new window
- Added support for studio to work in V-Ray 3.3
- Locked Camera transforms to prevent accidental movement
v3.05
- Update HDRI textures
v3.04
- Fixed bug in Shadow plane visbility turning off one frame late
- Stripped Light Cards and Shot Camera
- Camera Animation no longer writes past end of animation
v2.05
- HDRI files for use with PS_Studio stage setup script
- Shadow Plane no longer contributes to refraction
- Slider time sets to 0 when clearing scene to prevent unintentional rotation
- Added Partial Spinner Camera Rig Option
- Adjusted Environment HDRI rotation for Product Rig
- New Environment HDRI applied
- Fixed a bug in Rule of Thirds functionality for 2013+ Max
- Fixed bug in Rule of Thirds button on/off toggling
- Fixed bug in Light Rig Control Group creation
- Users Render Dialog Open/Close status retained when setting quality
- Update to Food and Character Light Rigs
v2.03
- Shadowplane VRay Properties Adjustment
- Slidertime set to 0 before clear
- Added Partial Rig Option
- Adjusted Environment HDRI rotation for Product Rig
- Fixed Rule of Thirds functionality for 2013+ Max
- Fixed bug in Light Grouping
- Fixed bug in Rule of Thirds button on/off toggling
- Changed Render Dialog status to recognize user Open/Close
- Update to Food and Character Light Rigs
v2.02
- Fixed Bug in Adjust Individual Light Intensity not Registering light rigs
v2.01
- Fixed bug in Spec Lights not Adjusting per frame in Shot Camera
v2.00
- Added crease test from CheckmatePro 2.0 script
- Added workflow locks to prevent breaking of Light Rig Rotation
- Added workflow locks to prevent going to Spinner from Shot Camera
- Change render settings to be true Linear by default so 2.3
- or lower will have to turn on sRGB manually
- Added support for VRay 3.0
- Added Spec lights to correct layer for Classic Car Rig
- Turned on Show Calc. Phase for Light Cache
- Ungroup HeroObjectGroup on Clear Scene
- Move HeroObjectGroup to Default Layer when created
v1.07
- Updated HDRI Spinner values
v1.06
- Fixed bug in values on Individual Light Adjustments for Product Rig
- Removed horizontal flip on HDRI overrides
- Mapped to updated HDRI files
v1.05
- Removed Current Lens selection display
- Spinner Lens drop down reset to current lens choice on UI open
- Spinner camera default lens set to 50mm
- Render Scene Dialog closes before making Quality changes
- Added Edit Shot button
- Edit Shot tool set added
- Added Done editing button to Light Adjustment Button in Shot Camera Rig
- Light Adjustment Button relocated and made Larger
- Generate Shot Camera changes Safe Frame Settings for Rule of Thirds
- Added Rule of Thirds Button to toggle Safe Frame display
- Environment HDRI Intensities now keyable for Shots
- HDRI spinner added to “Adjust Individual Light Intensity” UI
- Fixed typos in Env. HDRI error messages
- Selection is now retained after clicking Snap Shot
v1.04
- Fixed VRay 2_40_3 version conflict
v1.03
- Light Values Fixed
v1.02
- Changed Keep Selection in Scene to checked as default
- Updated to Work with VRay version ( 2_3_xx, 2_4_xx, and 2_5_xx )
v1.01
- Hardcode in Linear Gamma settings for Bitmap Input and Output
- (Settings not available in UI for Max 2014)
v1.0
- Initial Release
LAST UPDATED: June 3, 2020
TOOL VERSION: V3.25
The PixelSquid Studio is a tool that will prepare your scene with all of the render settings, lights and a camera. This script must be run on each model before submitting to ensure quality. The script creates the stage based on the size of the object, so the script should be run after the geometry is complete, but before the texturing is complete. Textures and Materials will need to be calibrated to match Studio lighting. The Studio tool is compatible up to Max 2020 and V-Ray versions 2 through 4.
Using the Script
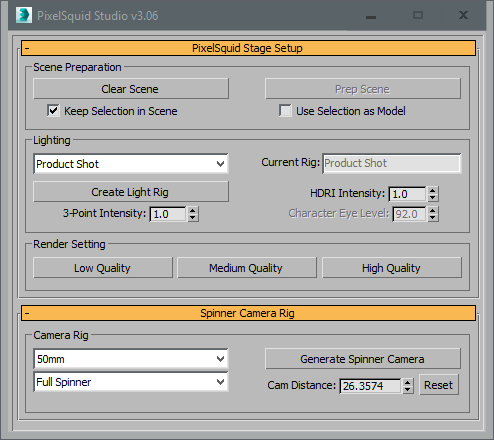
Once the script is installed, you can run the script from the location you chose during installation. When you launch the script, a basic UI will load with a few simple features. For a summarized explanation of below, tool tips appear when hovering the mouse cursor over the UI controls.
Scene Preparation
Clear Scene
Deletes all objects in the scene. Checking on ‘Keep Selection in Scene’, everything but the selection will be deleted.
Prep Scene
Prepares the ground plane, render settings, render elements and grouping for the object. The scene must be prepped before the camera or light rigs can be generated. The size of the ground plane and other options in the script is determined by the size of the object, so the scene should not be prepped until geometry is finalized. Most of the features created are very specific to the rig and must not be edited or renamed. Everything in the scene is taken into account when generating the scene. Check on ‘Use Selection Only’ before clicking this button to have the script run on only the selected objects.
If button is locked the UI was open when no objects present in the scene. Close the window and open the UI again after there is object(s) to prep.
Lighting
Select Light Rig
The drop down menu offers lighting options The different options will change the types of lights, HDRIs, and other lighting settings when generating the light rig. All light rigs may not currently be available. More rigs may become available in future updates.
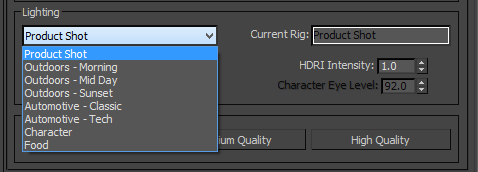
Create Light Rig
The button generates a very specific light rig required for all PixelSquid models. The light rig is dependent on the size of the model and should be generated after the scene has been prepped. The position, settings and textures used by the lights should not be edited. The lights will automatically reference the HDR maps and light map textures provided in the download. An environment background will be applied automatically for each light rig.
Current Rig
This box displays the light rig choice that was generated and currently being used in the scene.
3-Point Intensity
This setting controls the brightness of the lights linked to the 3-Point rig in the scene. Adjust this spinner to a level that the model looks best at.. Changing this value will live update the specified lights in the scene. It is not necessary to click ‘Generate Light Rig’ again.
HDRI Intensity
This setting controls the brightness of the HDRI dome light(s) and Environment HDRIs in the scene. Adjust this spinner to a level that the model looks best at. Changing this value will live update the specified lights and maps in the scene. It is not necessary to click ‘Generate Light Rig’ again.
Character Eye Level
This setting controls the height of the lights accenting a characters eyes. The value is a percentage of total height of the model where 100% is the top and 0% is the bottom. Adjust this spinner so that the target two lights are just above the character’s eyes. Changing this value will live update the light position in the scene. It is not necessary to click ‘Generate Light Rig’ again.
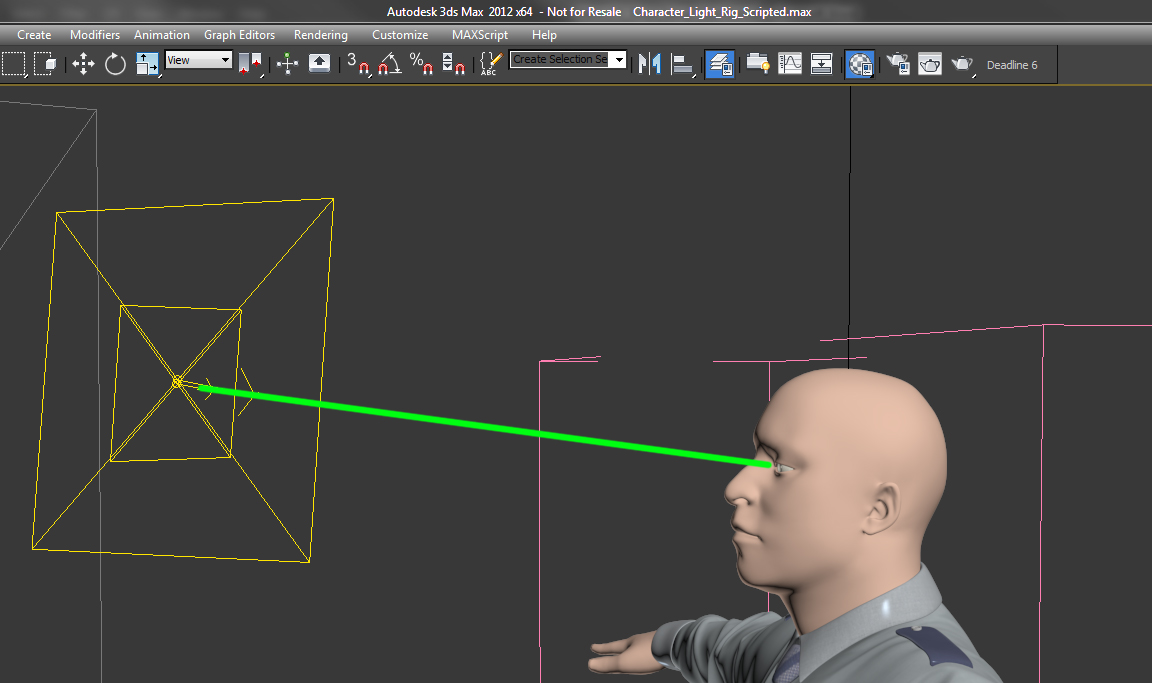
Render Settings
Low Quality
Updates render settings to render quickly while you are working on the model and doing larger general changes. Resolution is 600×600. This is low quality for preview renders specific to the V-Ray version in use.
Medium Quality
Updates render settings to allow more resolution and higher quality than ‘Preview’ without going up to ‘High Quality’ settings. This is useful when working on details of a model. Resolution is 1024×1024. This is medium quality presets specific to the V-Ray version in use.
High Quality
Updates render settings to high setting required model submission. The 8 QA renders should be generated using the ‘High Quality’ settings. Resolution is 2048×2048. This is High quality for product rendering presets specific to the V-Ray version in use.
Spinner Camera Rig
Select Camera Lens
The drop down menu offers camera lens options for the to be used in scene. The different options will change the Field of View and Camera distance when generating the camera rig.

Select Spinner Type
The drop down allows you to select whether the rig generates the full spherical camera rig or just the top half. This is used for models that do not need the bottom half shown.
Generate Spinner Camera
The button will create and animate the Spinner camera required for a PixelSquid model. Can only be used after the scene has been prepped. The camera must not be renamed or moved as it will break the rig. If the rig does break, simply generate the camera again.
Camera Distance
Use this spinner to adjust camera framing of your object without clipping out of frame. Scrub through the animation sequence to make sure the model does not go off frame at any point. The distance will vary based on the lens choice and the model when camera was created.
Reset
Use Reset button to set Camera Distance back to default lens selection was generated with.

