
Configuring Your Materials
The Material Configuration Page allows you to provide information about the materials used in your StemCell model. The model file you uploaded will be used for information about the materials, but you will need to link the PBR Metallic textures to the appropriate materials. Once all the materials are configured we will continue to convert the StemCell into all the output formats.
Auto-Assignment of Textures
Based on the name of the texture files our servers will attempt to auto-assign them to the correct texture slots. However, the texture assignments should be reviewed before submitting. The auto-assignment is based on the StemCell Naming Conventions located in the StemCell Specifications.
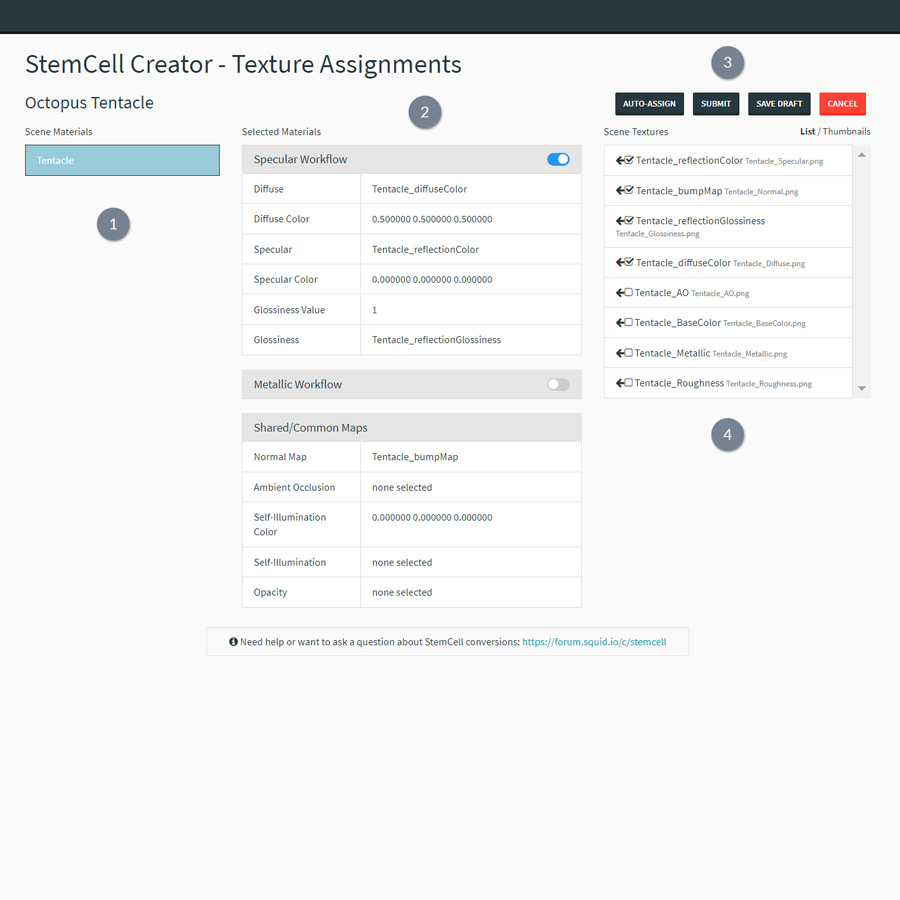
The Material Configuration Page has several sections with different functions:
- Scene Materials: Selects the active material to review or adjust.
- Selected Materials: Displays the active material with the texture assignments.
- Scene Textures: Displays a list of Scene textures and if they have been assigned yet. The texture file name is displayed in the smaller grey text below the map type.
- Workflow Buttons: Allow the job to be submitted, saved, or cancelled.
Configuration Process
The Material Configuration page can appear confusing at first, but the process is quite simple. The following is a basic guide on the steps you will need to follow:
- Select the material you want to configure by clicking its name in the ‘Scene Materials’ section.
- Review the auto-assigned textures in the ‘Specular Workflow’ and ‘Shared/Common Maps’ sections. If any slot needs to be updated, you can click on the slot and then the correct texture from the ‘Scene Textures’ section. Ambient Occlusion maps need to be assigned by hand.
- If the material also has PBR Metallic textures for game engine conversions, activate the slider next the the ‘Metallic Workflow’ box.
- Manually assign the Metallic/Blend, Roughness, and Albedo textures from the ‘Scene Textures’.
- Repeat for each material used in the scene.
- Once all the material are configured, click the ‘Submit’ button to send the model to conversion
There can be some confusion caused by the texture naming conventions. The texture type, texture suffix, and texture name on the material configuration page can vary. The following chart shows the links between the names.
| Texture Name Chart | ||
|---|---|---|
| Texture Type | Texture Suffix | Material Configuration Name |
| Diffuse | _Diffuse | “Material Name”_diffuseColor |
| Specular | _Specular | “Material Name”_reflectionColor |
| Glossiness | _Glossiness | “Material Name”_reflectionGlossiness |
| Metallic/Blend | _Metallic | “Material Name”_Metallic |
| Roughness | _Roughness | “Material Name”_Roughness |
| Albedo | _BaseColor | “Material Name”_BaseColor |
| Ambient Occlusion | _AO | “Material Name”_AO |
| Normal Map | _Normal | “Material Name”_bumpMap |
| Self-Illumination | _Emissive | “Material Name”_Emissive |


