
Linear workflow has become an industry standard that most studios have adopted because of the power and flexibility it affords them. It’s much easier to adjust the level of an objects reflectivity or change the base color of a single model part in Photoshop, instead of fine tuning and re-rendering from 3D. Each render layer or element, contributes to the final image. The diagram below outlines the basic flow of a linear pipeline.
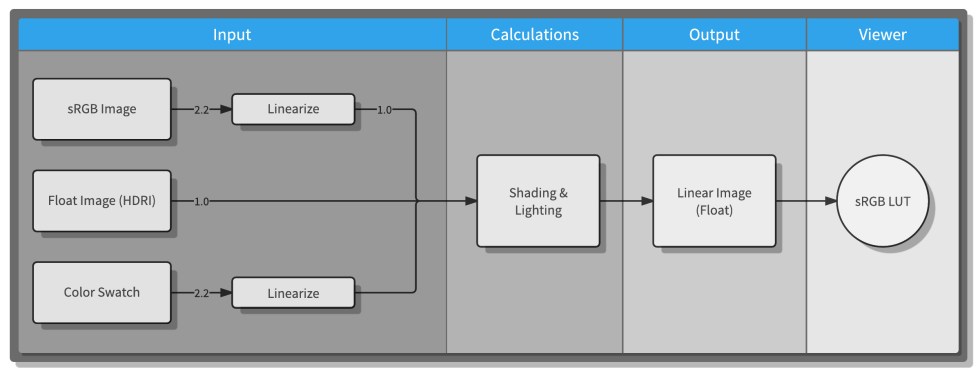
Input – all inputs should either already be linear or gamma corrected to be linear. Calculations – once everything is linear, you can begin shading and lighting. Output – renders should be saved as floating point linear images. Viewer – the linear images will appear dark unless viewed using an sRGB LUT (Look Up Table).
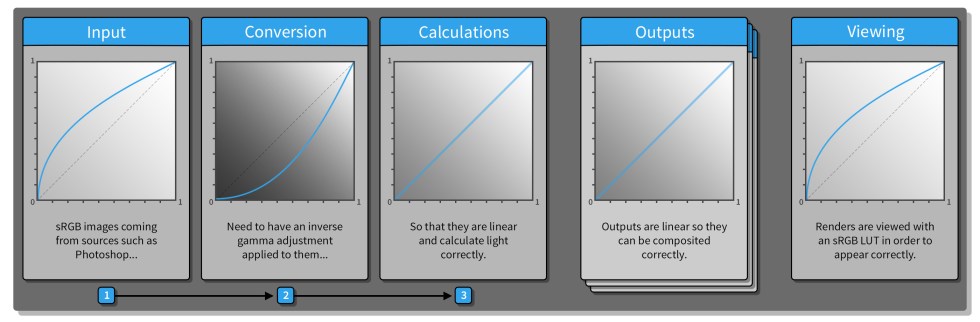
Another way to look at it, is as a series of curves applied to different inputs and outputs. If you’re working in a linear pipeline, you’ll need to correct certain types of images so that they output the correct result. When a bitmap created as an sRGB image enters the pipeline, it needs to be inverse gamma corrected to work properly. Then, when you output the renders, they’ll need to be corrected to appear as expected on your monitor. Working this way will insure that the math adds up correctly.
With all that said, let’s explain the steps you need to take in order to setup your personal pipeline for a linear workflow. These instructions are extremely important and should be followed closely to avoid a cascading effect of errors further down the line. Let’s begin…
Monitor Settings for a Linear Workflow
The first thing to do, if you have the option, is to set your monitor color to sRGB. Most current computer monitors now have an sRGB option as a color preset. Check your monitor’s user manual for instructions on how to switch it to sRGB.
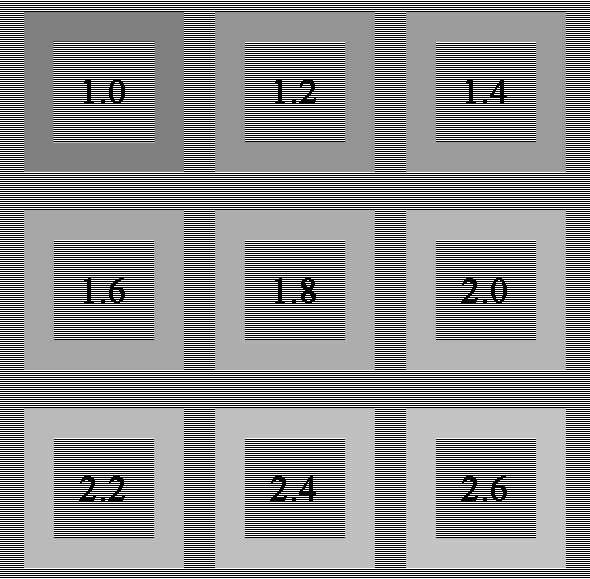
If your monitor does not have an sRGB setting, don’t worry. You can still set yourself up for proper color workflow by following the instructions below. To get an idea of what gamma level your monitor is set to, move back slightly and look at the image below with your eyes half closed or if you can slightly blurred (by slightly crossing your eyes). Compare the numbered outlines and stripes around them. The combination that appears closest in brightness roughly represents the current gamma value of your monitor.
Photoshop Settings
Chances are good that you’ll be creating textures in Photoshop at some point. So you’ll want to be sure your color settings are correct within Photoshop so your bitmaps are consistent when you bring them into 3ds Max.
Start up Photoshop and load an image. It doesn’t matter what the image is at the moment, it’s just necessary to have an image open to change some of the settings we’re going to be adjusting.
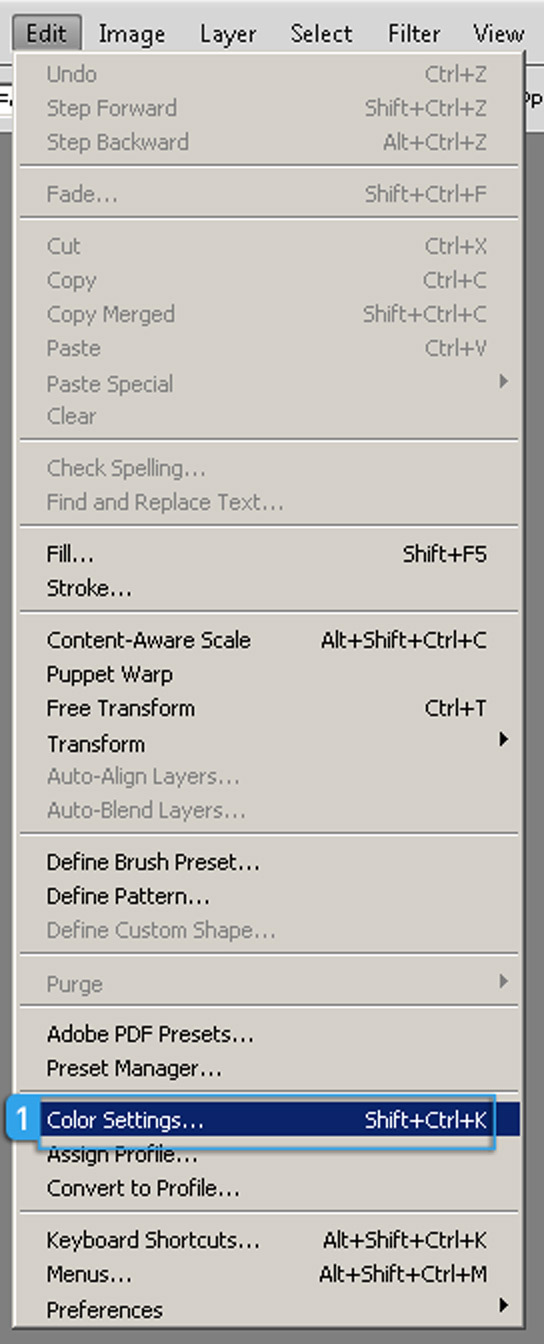
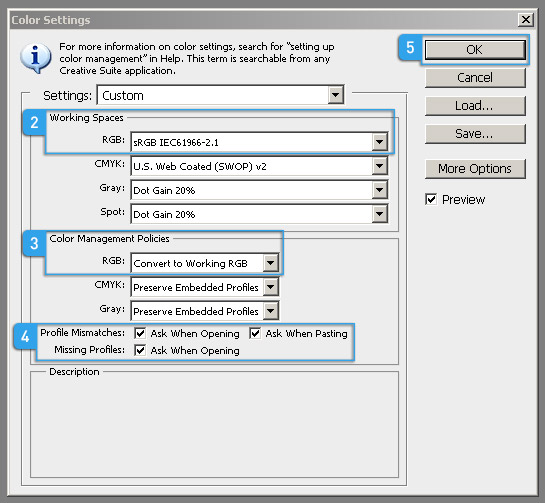
1. Select Edit at the top of the application window and then select Color Settings toward the bottom of the pop-up panel.
These settings will allow you to work in a consistent sRGB color space, and will embed an sRGB color profile by default into any images you create in Photoshop. You can also set Photoshop to ask you what to do when you open a document that isn’t sRGB. In most cases, you should always say yes, since you want your images to work with the sRGB color profile. Don’t worry, for the most part, you will see that most images conform to the sRGB profile.
Color Settings
2. Select sRGB IEC61966-2.1 in the Working Spaces > RGB: drop-down. This sets your work space as sRGB for here on until this is changed.
3. Under Color Management Policies > RGB: select Convert to Working RGB. This will convert any image you open to the current working color space and insure that you remain in an sRGB space.
4. Technically, you don’t have to do this step, but it’s usually a good idea to check all of these boxes so that Photoshop will ask you what to do when loading images that are either using a different color profile or have a missing profile. Saying yes to any prompts, will insure that all of your images are correct.
5. Click OK.
Proof Colors
If you would like to make absolutely sure that you’re seeing the image correctly…
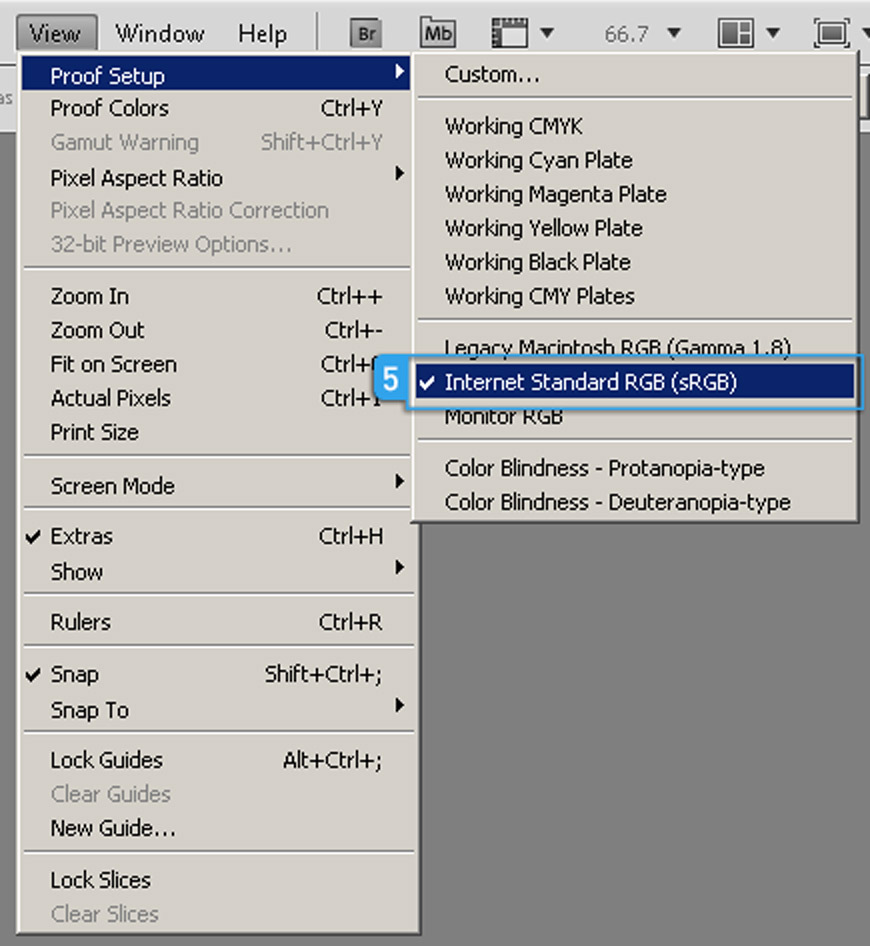
5. Select View at the top of the application window, then Proof Setup > Internet Standard RGB (sRGB).
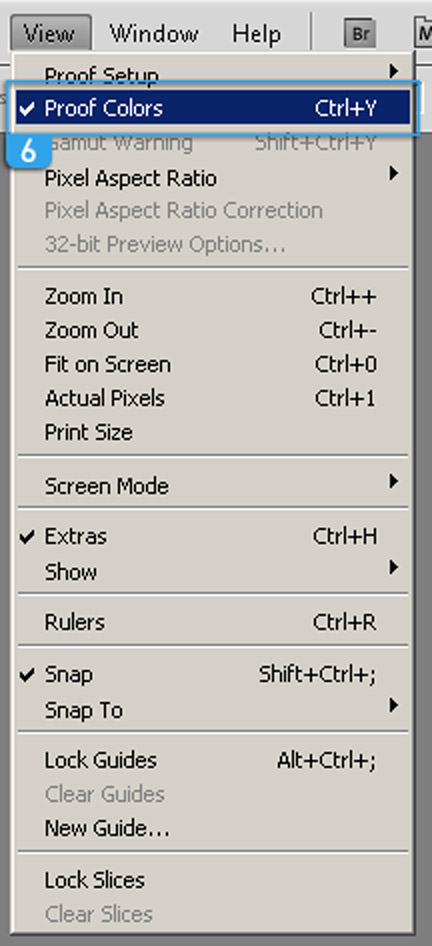
6. Select View again to make sure Proof Colors is checked.
In theory, everything should look exactly the same and you should see no shift in brightness. If you do see a shift, there’s something wrong and you should retrace your steps to find the issue.
Photoshop is now properly set up and when you output a bitmap, it will embed the sRGB color profile into the image.
3ds Max Settings for Linear Workflow
Start up 3ds Max. At this point it doesn’t matter what renderer you’re using.
Next, make sure Max is set up for a linear workflow.
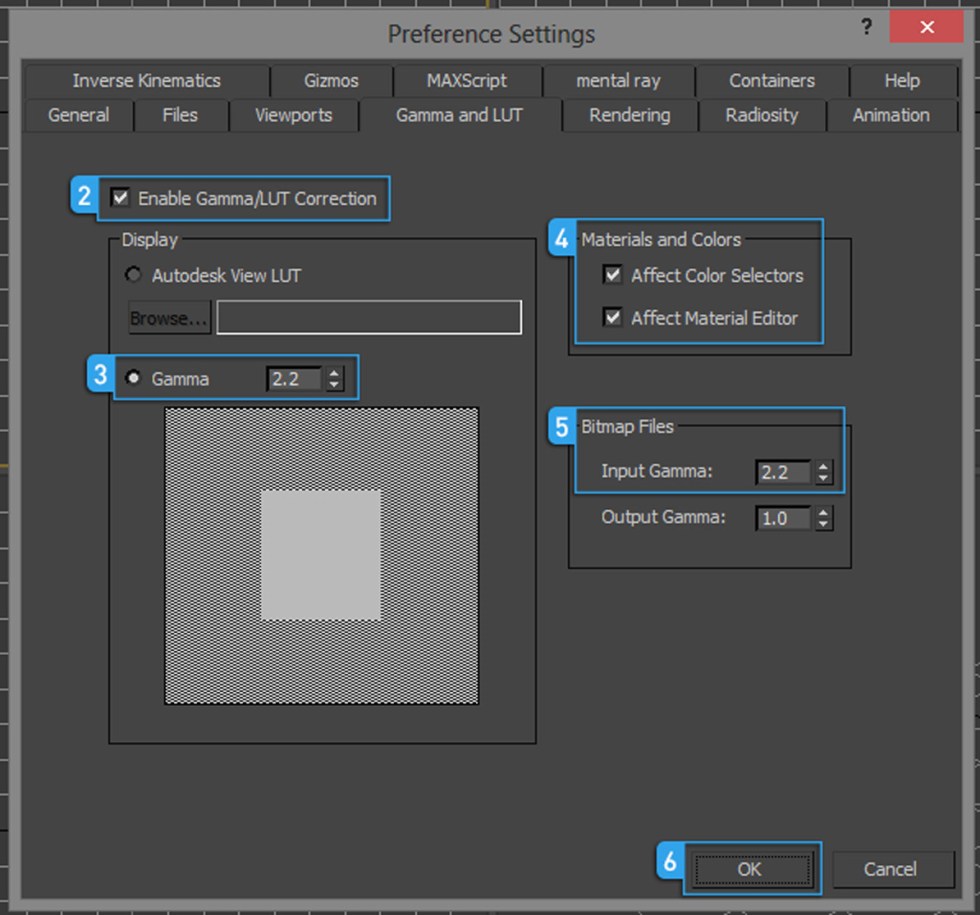
1. Go to Rendering at the top of the application window and select Gamma/LUT Setup… at the bottom of the pop-up panel.
2. Double check that Enable Gamma/LUT Correction is checked. This will ensure that you’re utilizing Max’s gamma correction environment.
3. Click the Gamma radio button under Display and make sure it’s set to 2.2. This is basically enabling gamma correction in the Max interface and will force your viewports to show the expected brightness.
4. Now check both Affect Color Selectors and Affect Material Editor under Materials and Colors. This forces Max to correct the gamma in the Material Editor and also the Color Selector so you see what’s expected .
5. Finally change the Input Gamma under Bitmap Files to 2.2. This will force all bitmaps loaded into Max to use a 2.2 gamma. If you set up Photoshop as indicated above, this should be correct for most bitmaps you’re creating.
Please Read!
It’s important to know that the reason we say “most bitmaps” is because certain bitmaps such as normal maps, displacement maps and value maps need to be used at gamma 1.0. Read the next section, Working With Bitmaps and Materials, to learn more.6. Click OK
Now Max is working in “Linear” mode.
Working With Bitmaps and Materials
Now that you’re working in a linear workflow, there are a few rules that need to be considered when working with bitmaps and materials. Certain bitmaps should not be gamma corrected to 2.2 such as normal maps, value maps (i.e. glossiness), some bump maps, some displacement maps and most HDRI’s. This can be especially true if these bitmaps were originally created in a non-linear environment.
Please Read!
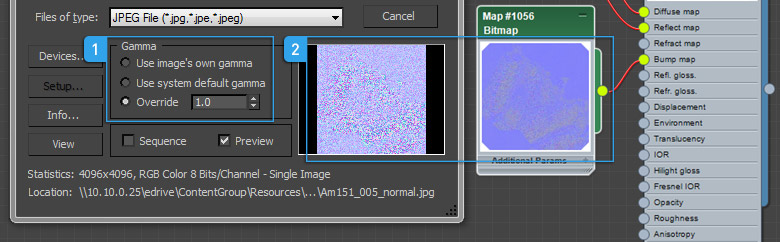
Gamma correcting Normal Maps, Bump Maps, Displacement Maps, Vector Maps and Value Maps to 2.2 will darken the bitmap and may cause your values to be too low.1.So, when loading these types of bitmaps into a linear workflow, it’s important to change the Gamma settings of the individual images to Override 1.0.
2.Notice the difference between the non-gamma corrected bitmap on the left, versus the gamma corrected bitmap on the right. That’s a significant difference which will cause serious problems when you render.
Example
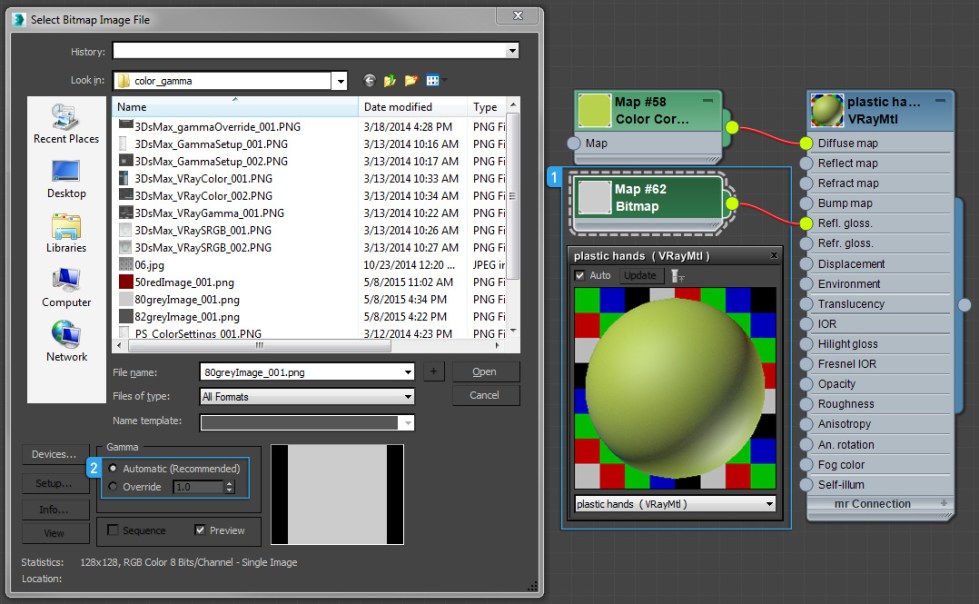
1.Here’s an example of a bitmap driving the glossiness value of a V-Ray material.
2.Since this bitmap is meant to be driving an absolute value (in this case 0.8), gamma correcting the bitmap would result in a much darker image (a value of 0.6 instead of 0.8). This would of course cause the material to be far too diffused.
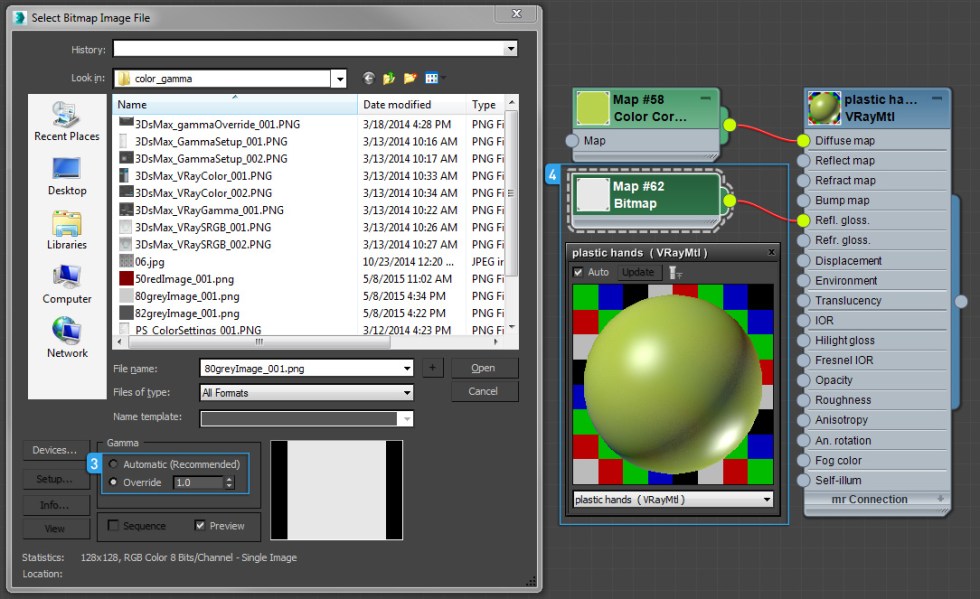
3.So, when loading these types of bitmaps into a linear workflow, it’s important to change the Gamma settings of the individual images to Override 1.0.
4.This forces the bitmap back to the value where it belongs (in this case 0.8). Now the material looks much shiner and as expected.
Precise Color (Floating)
Another rule to remember is that specific RGB color values can get a bit odd in 3DsMax when you’re working in a linear workflow. An example of this is if you are trying to match the exact RGB values from a client. There is however, a very easy way to have true RGB values when utilizing a linear workflow.
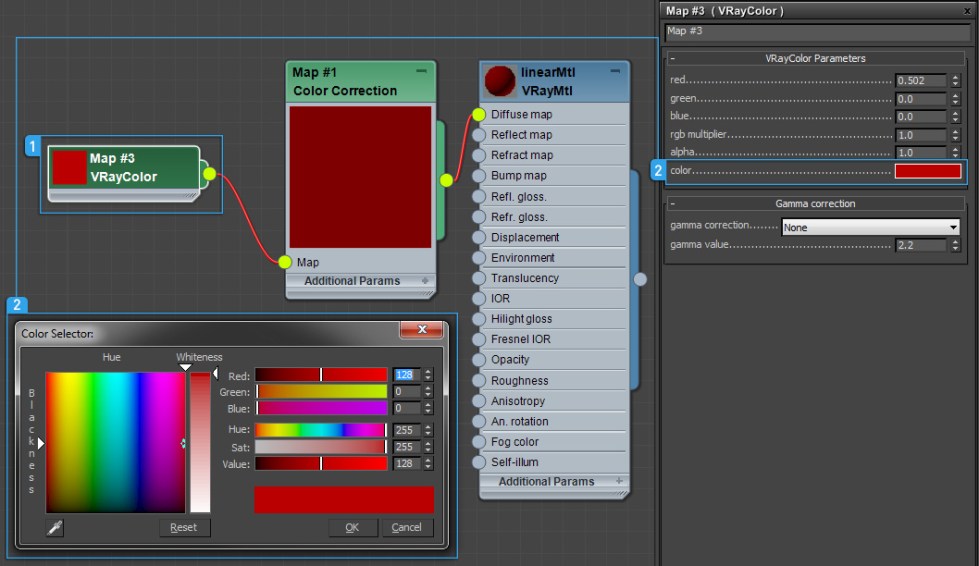
1.If you’re used to working with floating color (i.e. 0.0-1.0 instead of 0-255), you can simply add a Color Correction node.
2.Click the color swatch which will open a Color Selector which will allow you to input the exact color you want.
3.Then select Advanced under the Lightness tab and set Gamma/Contrast to 0.455. This is the inverse of 2.2 and will give you the true RGB value.

Precise Color (VRayColor – RGB)
If you are not accustomed to working with floating color and would rather input the exact RGB values…
1.Simply add a VRayColor node and plug it into the Map slot of the Color Correction node.
2. Click the color swatch in the VRayColor’s Parameters and set the RGB values to what you want by using the Color Selector.
Precise Color (Bitmap)
Alternatively, if you don’t feel like dealing with Color Correct and/or V-Ray nodes…
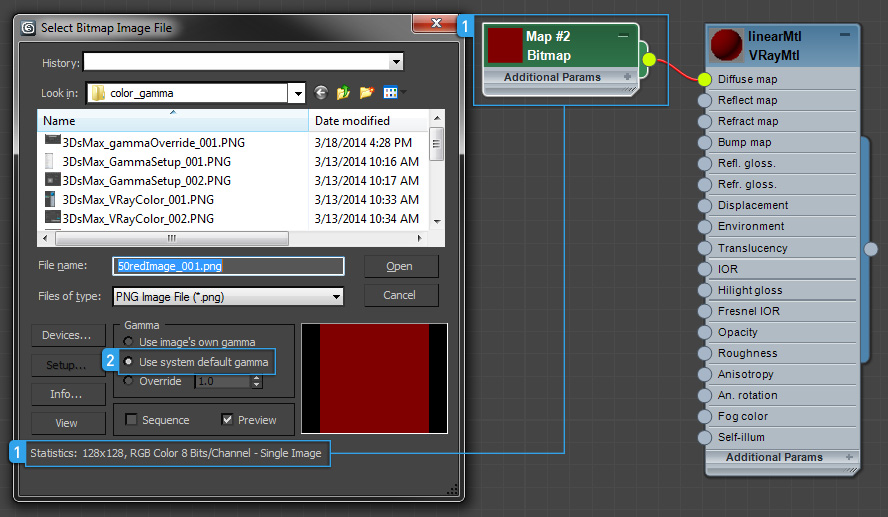
1.You can simply create a small (128 x 128 pixel) image in Photoshop that is entirely the color you need.
2.Then load that bitmap into 3DsMax using the system default gamma, and plug the bitmap into the slot you’re trying to drive (in this case the diffuse color slot of the VRayMtl).
VRay Settings
If you’re rendering with V-Ray, we can now set up VRay’s Color Mapping under Max’s Render Setup. We don’t want to bake the gamma curve into the final renders, but we do want to see our renders correctly, so these settings will ensure that V-Ray outputs the correct linear images, but displays the expected result.
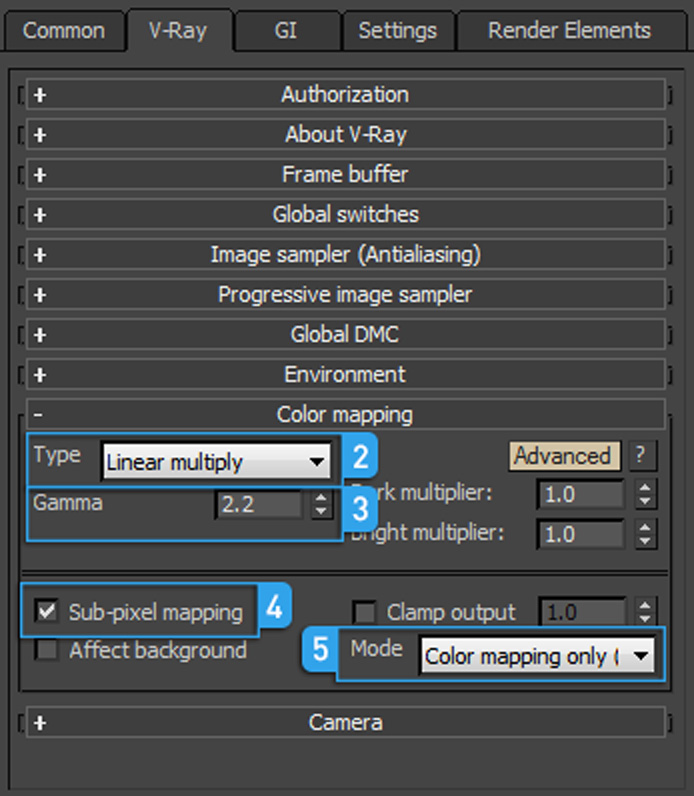
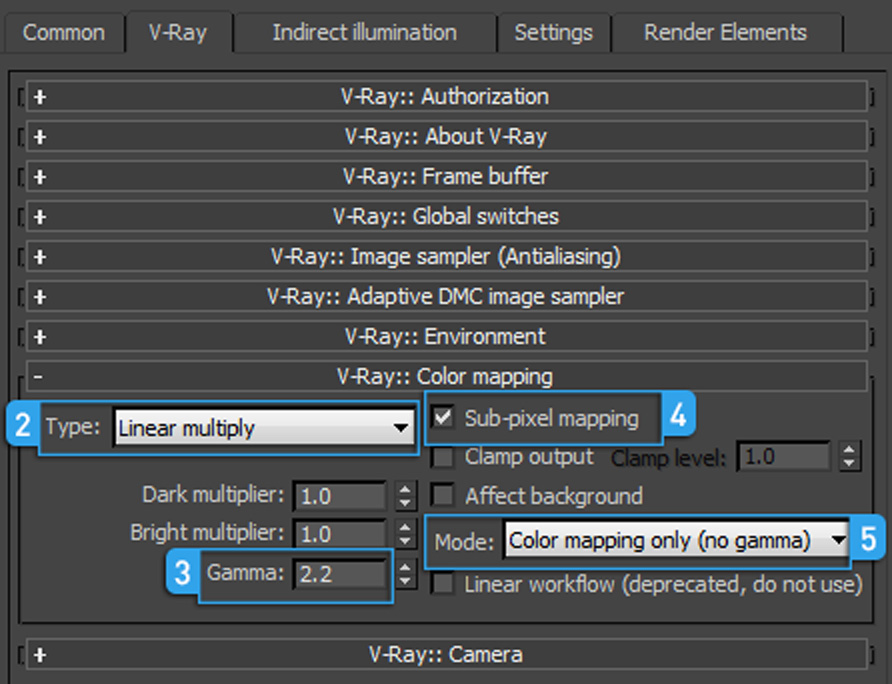
1. Go to the VRay tab in Max’s Render Setup and look for the VRay:: Color mapping section.
2. Make sure that Type: is set to Linear multiply. Since we will not be compositing the final renders ourselves, Linear multiply gives us better contrast from darks to lights than any other setting and works very well in our linear workflow.
3. Set Gamma: to 2.2. This guarantees that V-Ray is performing calculations to the brighter gamma corrected image and not to the darker uncorrected image. This can be especially important for reducing noise and flicker.
4. Check Sub-pixel mapping. This will soften over-bright highlights in the final rendered image so that extra bright highlights appear more film like.
5. Finally, make sure Mode: is set to Color mapping only (no gamma). We want the effect of the color mapping to affect our renders, but don’t want to burn the 2.2 gamma into our final images. This would cause our final composite of all the render elements to be far too bright since each one is added above the previous.
V-Ray 3 Settings – Notice that you must select “Advanced” in order to see the settings.
V-Ray 2.4 Settings – The “Mode” drop-down was introduced in V-Ray 2.4.04.
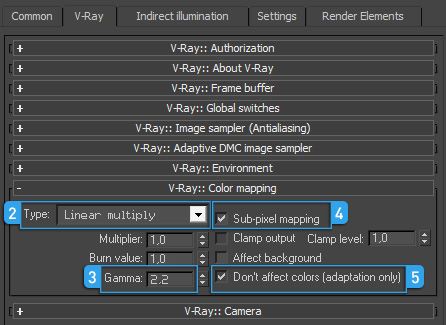
V-Ray 2.4.03 and earlier Settings – Notice that there is no “Mode” drop-down, only the “Don’t affect colors (adaptation only)” checkbox which should be checked.
V-Ray Framebuffer (VFB)
Finally, this is very important, render your tests using the VRay Framebuffer (VFB), and be sure that sRGB is turned on in the VFB preview window. Since we are not baking the 2.2 gamma curve into the renders, we need the VFB to add a 2.2 gamma curve to the preview. Otherwise, the render will appear to be too dark and any attempt to brighten them without using the sRGB button would be incorrect.

We realize that understanding a linear workflow can be frustrating and daunting at first, and we hope this document has helped you get a better understanding of how easy it can be. Once you get a clear understanding of what a linear workflow is and why it’s important, you should be able to go from Photoshop to final render without any unexpected surprises. Good Luck and always feel free to ask questions.


