
When customers open your model, they expect all of the bitmap textures you used to be present and to load without errors. They also expect all of the bitmap texture files and materials within your model to have meaningful names. Production artists find it very frustrating when they have to search for bitmap texture files or waste time figuring out which bitmap texture goes where and what each material represents. As such, it’s important to remember to do the following things regarding texture references:
 For StemCell (6.8.1, 6.2.1 RT) certification, you are required to use meaningful texture names and strip your texture paths.
Meaningful Bitmap Texture Names
Remember that your model will often be merged into another scene with other models. When the bitmap textures and materials are named correctly, it makes it much easier for an artist to find, edit, and replace them as needed.
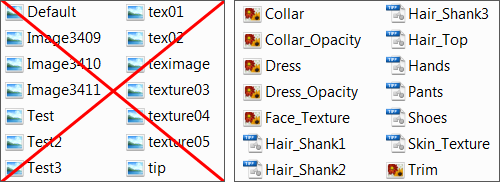
Which textures would you rather use?
In addition to giving your bitmap textures and materials meaningful names, you should also strip out all bitmap paths referenced within your 3d application. If you don’t do this, customers will receive an error messages when they load the scene. The error will state that your bitmaps can’t be found even if they’re included with the model. See below for more specifics.
Stripping Texture Paths
Your model should contain no explicit bitmap texture paths within them. Instead, the ZIP or RAR file you upload should be set up with a “flat” file structure (no subfolders) or contains a single bitmap textures subfolder so that by default, all the files will extract into a single location.
This file structure is necessary for several reasons. First, customers can’t devote production time to sifting through multiple subfolders for bitmap texture files. Second, they don’t always have time to integrate unfamiliar folder structures into their own production pipelines. A customer who wants a separate folder structure for bitmap textures prefers to create folders themselves and move the bitmap textures there after opening so they know exactly where they are.
Bitmap Textures and Materials Checklist
Make sure your bitmap textures and materials are set up as follows:
- Your bitmap texture maps have meaningful names
- Your materials have meaningful names
- Materials that are not used in the scene are not referenced by the scene. For example, if you use 3ds Max, materials not used in the scene should not be present in the Material Editor.
- Your bitmap textures do not reference an explicit path or subfolder (no texture paths)
- That you package up your model and textures in one of three ways:
- Bitmap textures are packaged in “flat” file structure in the ZIP or RAR file. This process is repeated for each 3D file format.
- Bitmap textures are placed into a single subfolder beneath the main product file in the ZIP or RAR file. This process is repeated for each 3D file format.
- All bitmap textures required are placed into a single, named ZIP file and uploaded once as a Textures Supporting Items product in the TurboSquid publisher. Model files are each placed into their own named ZIP files and uploaded on their own.
Most 3D software applications have tools for packaging bitmap textures with the model. Using these tools ensure that all required bitmaps are included in the archive file. See your application’s help documentation for information about how to do this.


