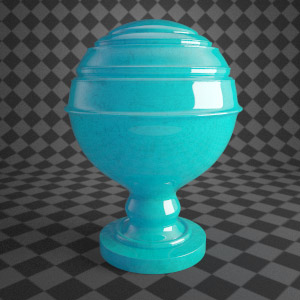
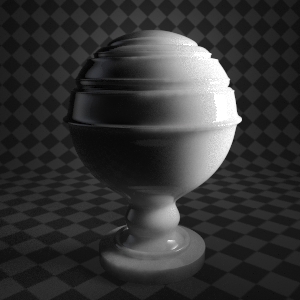
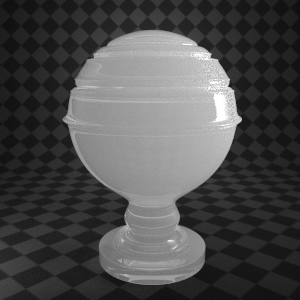
The VRay FastSSS2 Material is designed for creating translucent materials (ones that scatter the light inside the object). Some common examples are: skin, marble, wax, milk, etc.
Compared to the “translucency” option in the regular VrayMtl, it has a far better sub-surface scattering model (SSS) – FastSSS2 is faster and much more advanced. For this reason it’s preferable to use the FastSSS2 material whenever you need to make a translucent shader.
Settings
Since this material works in a slightly different way than other VRay materials, let’s look at its settings and some examples of how it works.
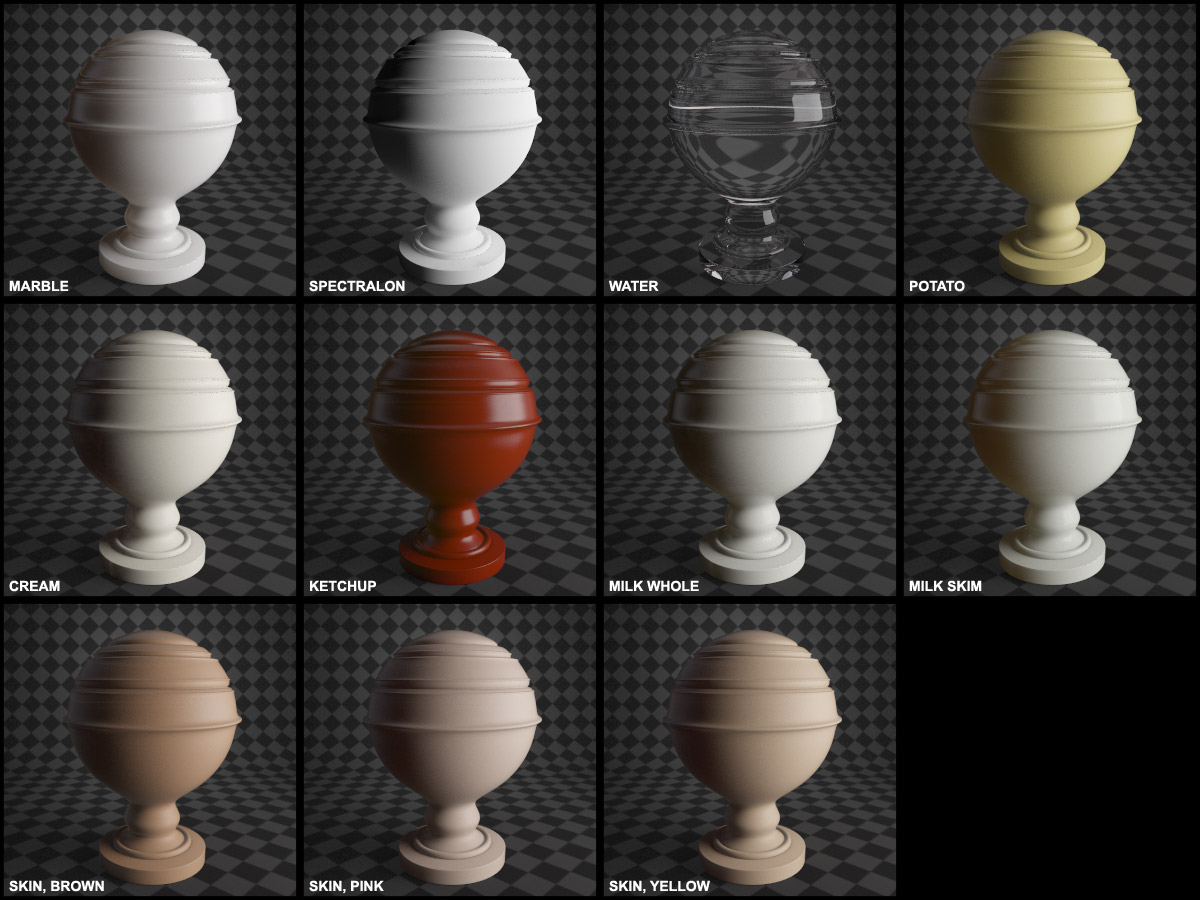
Presets
First up you have a few presets. These are pre-defined materials you can choose from a drop-down menu and quickly use in your scene.
They do need to be customized with your own maps to look their best (colors, bump, reflection, gloss), so look at them as more of a starting point than a finished material. Perhaps the only ones that work on the default settings would be the Milk presets, since for a liquid you may not need any maps.
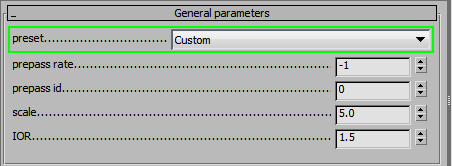
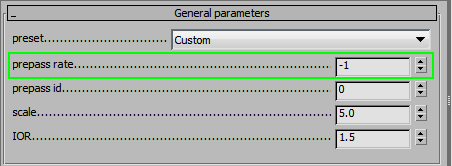
Prepass Rate
Next comes the Prepass Rate value. FastSSS2 calculates the distribution of light within an object using something similar to the Irradiance map, so this parameter sets how detailed we want this calculation to be. In general, for most cases you can leave it at -1 for optimal speed/quality. For test renders and objects without small details bring it down to -3 or -2. For very detailed objects that show some problem areas, try bringing it up to 0 ~ 1.
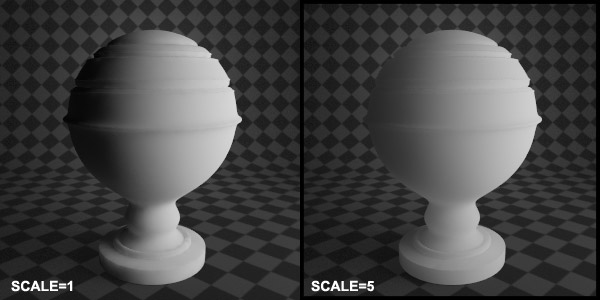
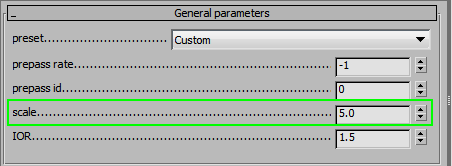
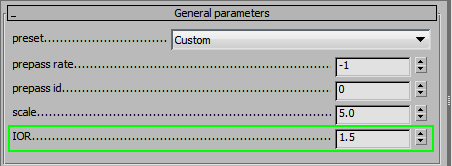
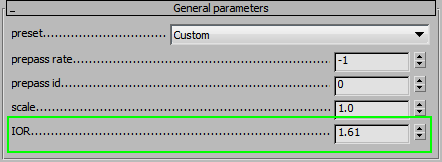
Scale
Scale controls the depth of the SSS effect. Since this material uses real world units to calculate the final result (you can set the scatter depth in cm a bit further down) this is an easy way to quickly turn up or down the depth. For example – setting Scale to 5 would give us Scatter Depth multiplied by 5.
IOR
IOR is the Index of Refraction we are so familiar with. Here are some general guidelines:
- Water based materials (milk, juice, skin, etc) set it to 1.333
- Stone/Marble 1.5~1.6 works best
- Glass 1.6~1.9
- Plastics 1.45~2.45. This parameter affects both – the Refractions (SSS) and Reflections, currently there is no way to unlink them.
Options
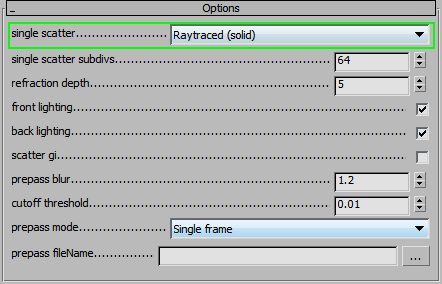
Before we proceed with the Diffuse and SSS layers, lets go down to the Options. The most important things to adjust are the Single Scatter type, Subdivs, and Depth.
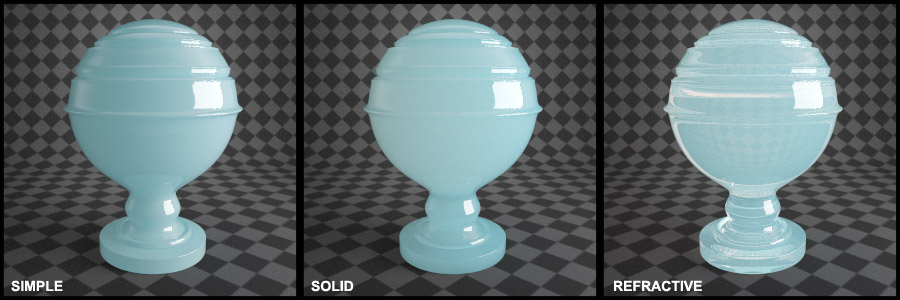
Single Scatter
Add in your content here. There are 3 types of Single Scatter you can use: Simple, Solid, and Refractive. These are all used for specific types of materials.
- Simple is the quickest to render and also the least accurate. It’s great if the material doesn’t let in a lot of light, but just a little bit (skin, plastic).
- Solid mode is best to use for use with materials that let in a lot of light, but at the same time are quite opaque, like translucent stone, milk, or wax.
- Refractive mode is for those materials which also have visible refractions and which you can see through relatively well, such as foggy glass, murky water, etc. This mode also makes the shadows transparent.
Subdivs and Refraction Depth
Subdivs and Refraction depth work much like regular Vray materials. Increasing subdivs cleans up the noise in the translucent areas. Refraction depth controls how much the light bounces around. In general, you can leave these settings at their default values. If they need to be optimized for a particular scene, say if an object is very refractive and not very opaque, you may try increasing the depth to be sure there are enough bounces to make it look realistic.
Most of the time the rest of the settings in this section work fine as they are. If the render appears too blotchy, you can play around with the prepass blur value. Higher values will blur the scattered light more, though decrease accuracy.
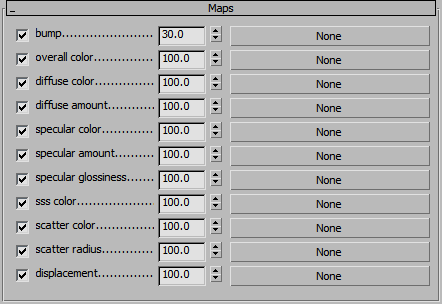
Diffuse and SSS Layers
This is the most important and at the same time the most confusing part of the FastSSS2 material. The problem is – there are many different colors to set up and they all seem to affect one another in some way, so it can be a bit difficult to tweak something without messing up something else.
Let’s try to look at what everything does.
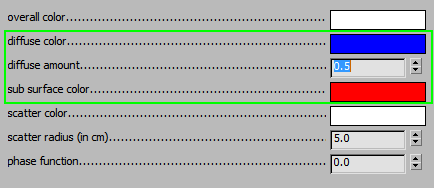
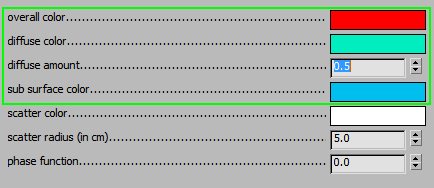
Diffuse Color, Diffuse Amount, and Sub Surface Color
We will start with the Diffuse and SubSurface colors. Essentially they set up what is the inner and outer color of the object and allow you to set exactly how much each one affects the final material. To demonstrate how this works, we’ve set up the Diffuse to be pure blue and SubSurface to pure red. Here’s how everything changes as we adjust the Diffuse Amount value.
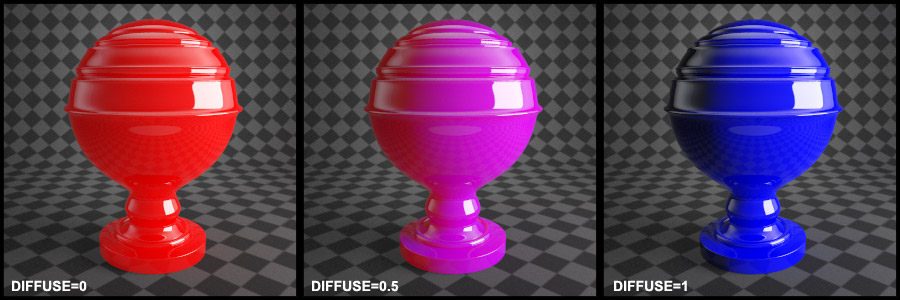
At 0 only the SSS layer is visible, while at 1 only the Diffuse is visible and there is no light scattering inside of the object. Everything in-between is a mix of these two.
Overall Color
Now let’s bring the Overall Color into the equation. This acts as a filter for both the Diffuse and Subsurface. It sets how much of the set color is to be seen in the actual material. Pure white [255;255;255] lets through 100%, medium grey [128;128;128] lets through 50%. So far it sounds simple, but it also works the same way with colors. Pure red Overall Color [255;0;0] only shows the red channel of both, Diffuse and SubSurface colors. In this case, it is pure black, since neither of the colors have any red channel value. Basically, the RGB value of Overall Color determines exactly what percentage of each channel in the other 2 colors is visible.
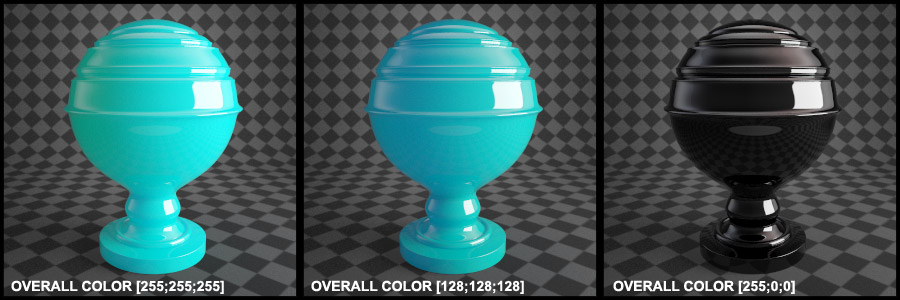
This is why I recommend sticking to grayscale values or grayscale textures in this slot. Otherwise it is very hard to predict the resulting look. It’s not ‘intuitive’, it’s math. A simple B&W map, however, can be a good way to make everything a bit more interesting without getting unexpected colors.
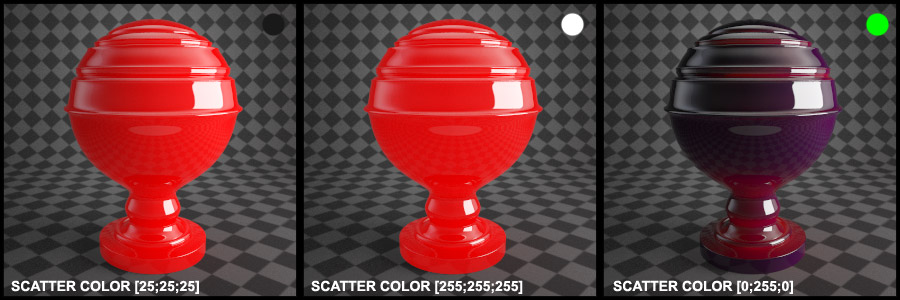
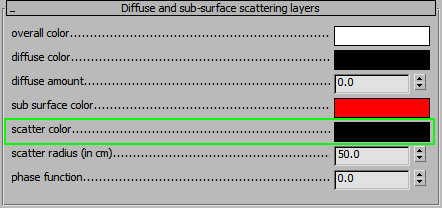
Scatter Color
Finally, there’s another color to adjust – Scatter Color. It defines the color of the scattered light rays once they enter the surface of the object. This means it also affects the intensity of the scattered light. If you set it to black, the light turns black and no scattering is going on.
Again, this one is a bit tricky to use if you use colors instead of grayscale values, since it interacts with the SubSurface color in a mathematical way. We’re not 100% sure of the exact formula behind it, so your best bet is trial & error. First, adjust the lightness of this color and then tweak the hue until you get the exact look you want. Usually the Subsurface hue and Scatter Color hue should be pretty close.
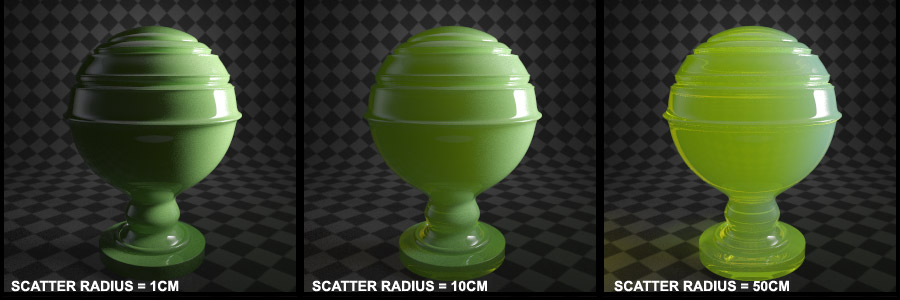
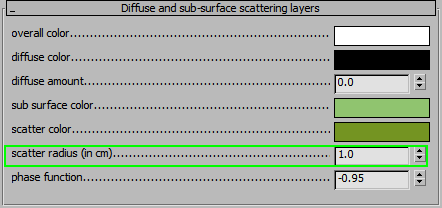
Scatter Radius
Scatter Radius allows you to set an exact depth to which the light rays can penetrate the surface. If you need to be sure the result is accurate, take care to keep the Scale at 1 and make sure the object’s XForm is reset.
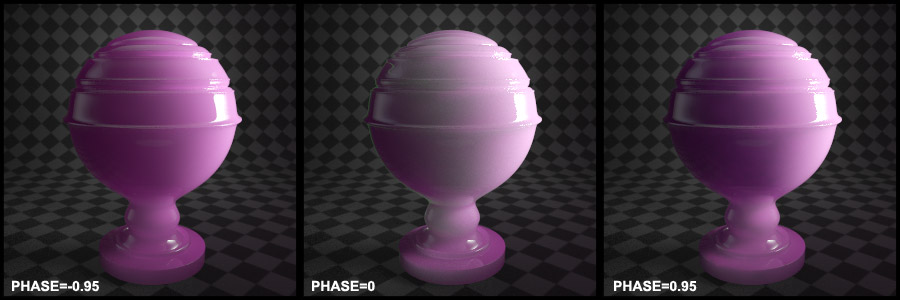
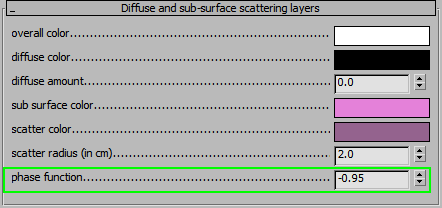
Phase Function
One last parameter to adjust here is the Scatter Phase. It can be set from -1 to +1 and it controls the way light rays travel within the object’s surface. 0 scatters the rays in all directions equally, positive values focus the light mostly forward, while negative values make most of the rays go backward. As a general guideline – water based materials (skin, juice, milk) tend to scatter the rays forward while hard materials (marble, glass) tend to scatter them backward.
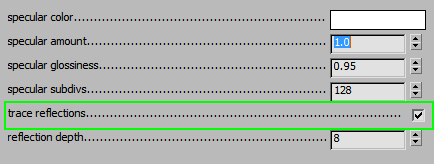
Specular Layer
If you are familiar with the regular VrayMtl, this section will be familiar to you. Basically it’s the same thing as the Reflection, just named differently. For physically accurate results, you must turn on the trace Reflections option, otherwise only fake speculars will be used.
As mentioned before, there is no way to unlink the Reflection IOR from the base IOR of the FastSSS2 material. Most of the time it shouldn’t be a problem, since that is the physically correct way to do it anyway.
Other Settings
With the exception of the Diffuse and SSS layers, most of the FastSSS2 material is similar to the regular VrayMtl, so the same principles apply. You can also use maps in many slots that initially seem to support only colors (no little squares to set up maps next to color slots). Just scroll down to the Maps section and plug them in there.
Workflow Example
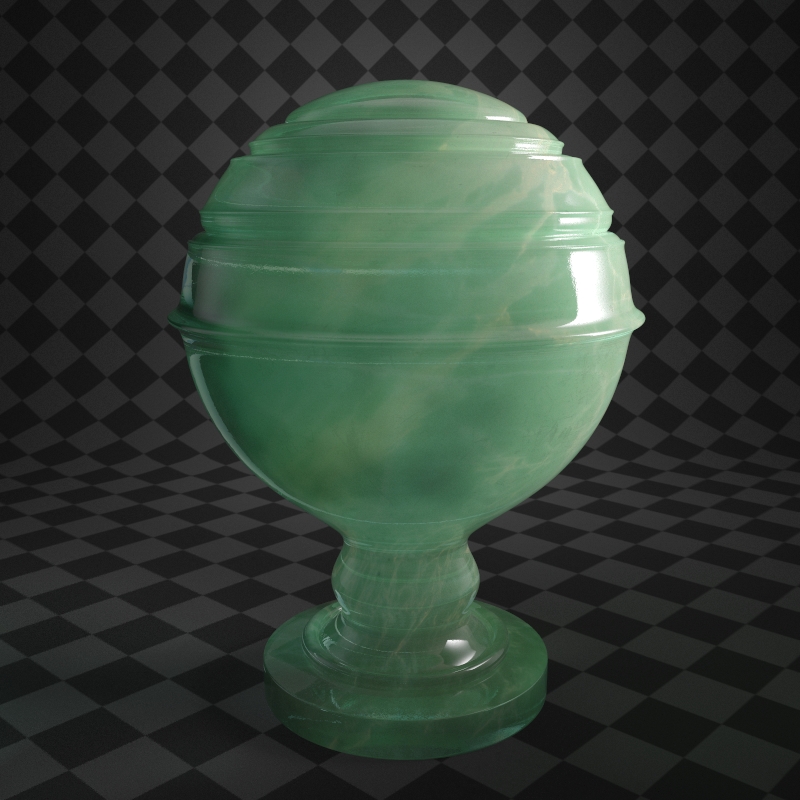
Let’s take everything we learned and create a translucent material from a reference photo. We’ll attempt to make something similar to this Jade.
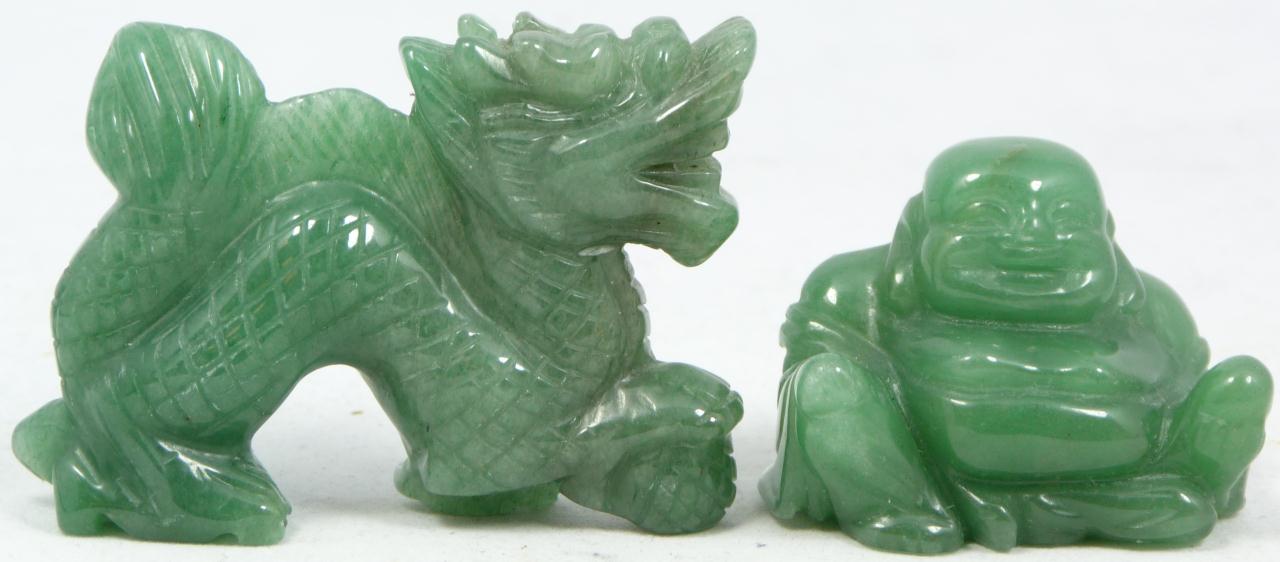
We’ll start by looking up the IOR for Jade on the internet. Turns out it is almost the same as glass – 1.61. Let’s set it up on our material.
Next, we need to determine what type of scattering we need. In the reference photo it looks like the material is a bit refractive – you can see through the thinnest areas. Let’s set up the Single Scatter mode to Raytraced (Refractive).
Next, we want to set up the basic look for the Reflections. Go to the Specular layer and make sure that the “Trace Reflections” option is on. It looks like the reflections are very glossy (highly polished surface), so we’ll set the Glossiness at 0.92. We also made the Specular color a bit darker [220;220;220] to make the reflections a bit more realistic.
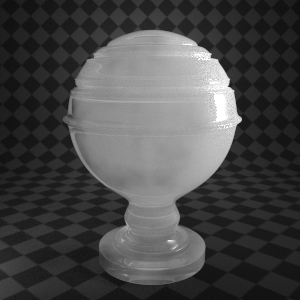
Let’s see what we’ve got so far…
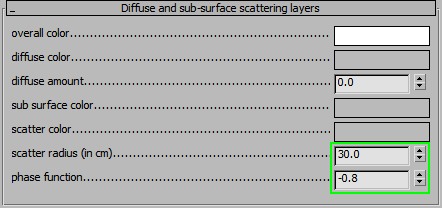
Ok, now we are ready to move to the most important step – the Diffuse and SSS layer. We’ll start by setting up the Phase function to -0.8, since this is a stone type material. Let’s also bring up the Scatter Radius, since it looks like the light is scattered pretty deep within the object. Let’s try something like 30 cm.
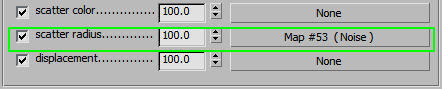
Right now it looks like the Radius is a bit too large, but that’s ok. We will use a Noise map in the Radius slot that will be multiplied by this same value. So if we have Radius at 30cm and a medium grey map [128;128;128] in the slot, the actual radius will be 30*0.5=15cm. This way we can give the material an effect where some areas appear less translucent and some are more translucent.
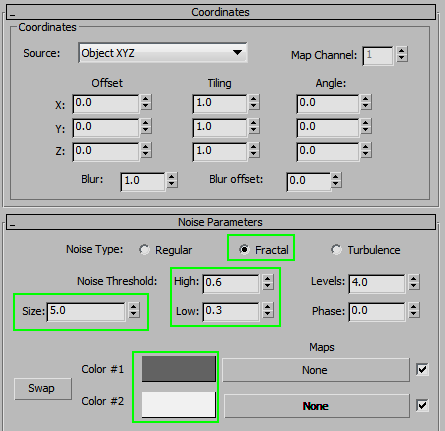
Here’s the noise map setup…
And here is the resulting render…
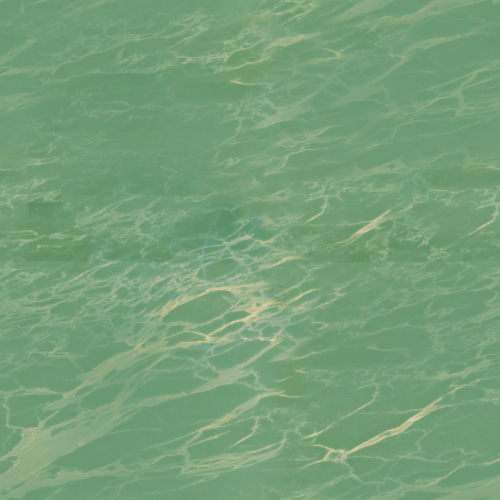
We’ll start by setting up this texture in SubSurface color slot…
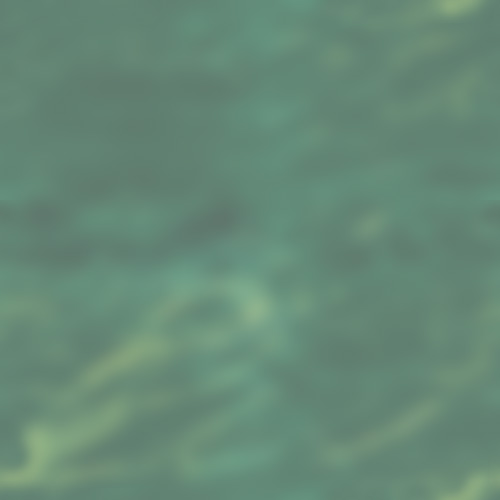
Now let’s tone the Scatter color. We want it to be more blue in the green areas and more yellow in the yellow areas. This image doesn’t need to be too detailed, so we blurred it. This will also help with the foggy look.
The results already look pretty good. Now we just need to add a few small details to make it perfect.
We’ll use this gray texture in the Overall Color slot to add some slightly dirtier looking patches to the object.
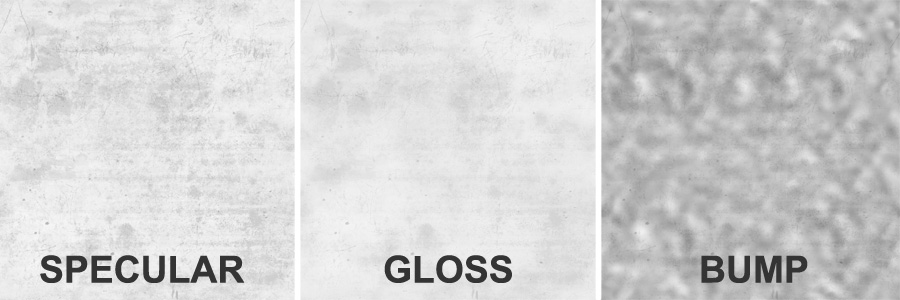
A variation of this texture can also be used in Spec Color, Gloss, and Bump slots to bring us to the finished material.
The material is finished. In this case, we did not need a Diffuse layer, since the outer/inner colors of the Jade material appear to be identical.
As you can see, the idea is to take care of the technical details first (IOR, scatter type, phase, etc.) then tweak the artistic parts (colors/maps).
Special thanks to Austris Čingulis from Viscorbel.com for helping us create this material tutorial.


