
This article is part of a two-part tutorial on The Crocodile by TurboSquid contributor, Francesco Furneri (Texturing Crocodile Skin in Substance Painter and Lighting and Rendering with Arnold for Maya). Here, Francesco covers key concepts and detailed information about lighting and rendering that should be helpful to 3D modelers working in any application.
TurboSquid is providing this section of Francesco’s tutorial for our contributors who wish to learn these key concepts that can make their storefront renders more engaging for customers.
Introduction To Sampling
When talking about rendering, sampling is one of the most important concepts to consider from the very beginning. I’ll explain what that means in terms of rendering a 3D scene by introducing some general concepts and then going through Arnold for Maya to finish with my specific project.
What I’m about to explain is not related to a specific 3D package, though there are some parts where I refer to a specific renderer. Lighting and rendering are considered the last steps during the creation of a 3D scene and they are related to each other. That means, for instance, that the presence of some light sources and their settings impact the time it takes to render.
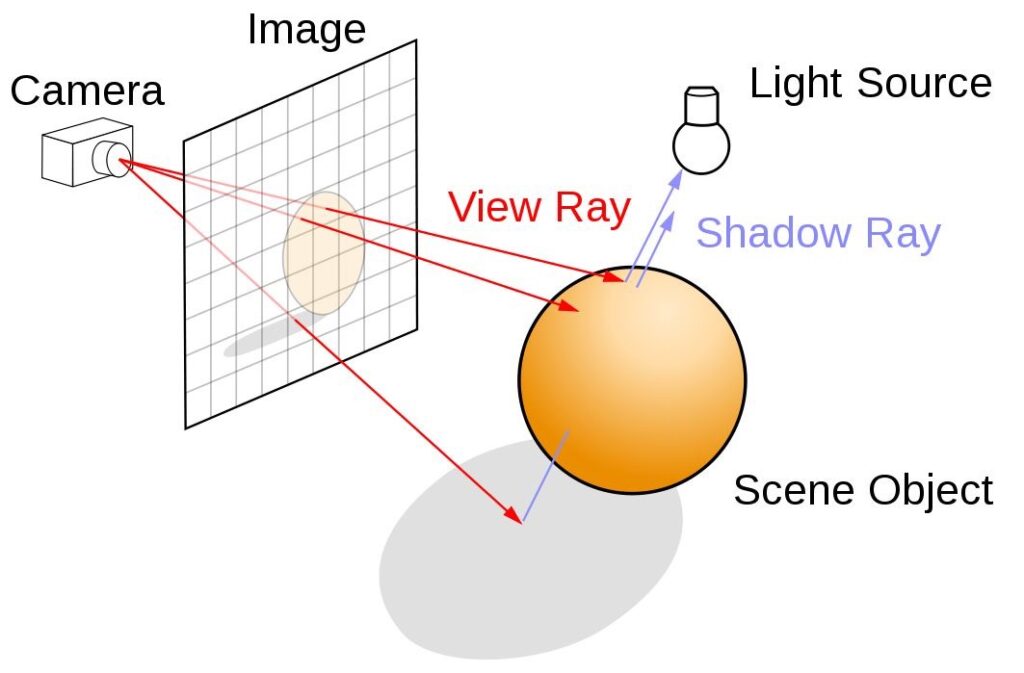
The presence of an environment map (an HDR texture used as an ambient light), for example, must be considered when accounting for render times. Arnold is a photorealistic render engine based on Path Tracing that uses a very powerful and accurate algorithm to calculate the global illumination in a scene. It is related to Ray Tracing in some ways. In Ray Tracing, the lighting is calculated by considering a series of View Rays, starting from the Camera towards the scene. When a ray hits an object, the ray can be reflected, refracted, and a Shadow Ray is traced from a point to the Light Sources to test if that point is in shadow or not. If the point sees the light, then a shading algorithm is used to determine the color of that point. The process of reflection/refraction stops after a certain number of light bounces defined by the algorithm.
In the first example below, there are no reflected or refracted rays. There are just two points that see the light source and one point which is in shadow.
The grid in the image below can be thought of as our screen where the calculated value of the points is projected back. For the first two points that see the light, the shading algorithm is performed and their value is sent back to the grid. Point 3, unlike points 1 and 2, is in shadow and the shadow value is also sent back.
Instead of tracing rays from the light sources, by starting from the camera, we can speed the process up and cut the rays that we don’t see from the camera. For instance, it will cut what’s behind the sphere, as long as the sphere is 100% opaque.
For simplicity’s sake, we have just considered the Direct Illumination without light bounces, but in reality, we should follow the Light Rays reflecting off of a surface or, if the material is semi-transparent, passing through by refraction. If we stop at Direct Illumination, we are talking about Ray Casting, whereas if we calculate the light bounces, we are talking about Ray Tracing and Global Illumination. But what’s the point of that?
The number of Camera Rays (View Rays) determines the number of samples. In other words, the higher the resolution of the grid, the more the rays and samples are considered in the scene. This means more quality and less aliasing, but the renderer takes more time.
Here is a more interesting example of Recursive Ray tracing dealing with more light bounces. 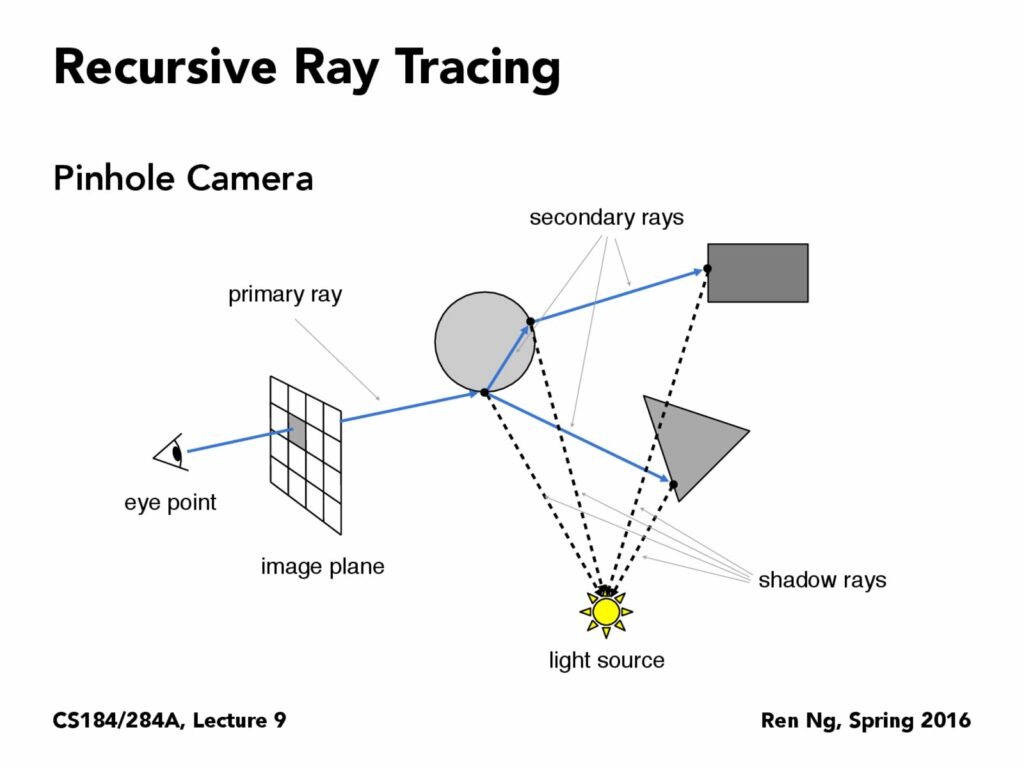
As you can see, the point on the image plane is the result of the Direct Illumination from the light source plus the contribution of reflected and refracted rays that bounce off of the point that is hit by the primary ray. There are obviously Shadow Rays in the scene.
The samples determined by the View Rays on the grid are called Camera Samples because they start from the camera. Those are the most important samples (also useful for the anti-aliasing calculation) but in rendering, there are also other types of samples (like Path Tracing in Arnold).
The algorithm uses the same principle as Ray Tracing but it introduces more accuracy when diffusing interreflection between surfaces and not just the specular reflection as the Ray Tracing does.
Let’s wrap it up with a visual description from the Arnold guide. Let’s say that we have a light source coming from up left that projects a shadow of the sphere on the floor. Eventually, there is also a 360° sky light. From the points where the camera rays hit the sphere, a series of other rays are created: they are called Indirect Diffuse Rays and they are responsible for the interreflection between surfaces.
In particular, for each sample on the sphere, there are n rays that look around to gather the lighting and color information from other surfaces for the particular sample. At the end, a sample on the sphere, has a color that is the contribution of all its indirect diffuse rays. In Arnold, those indirect diffuse rays are simply called Diffuse Samples.
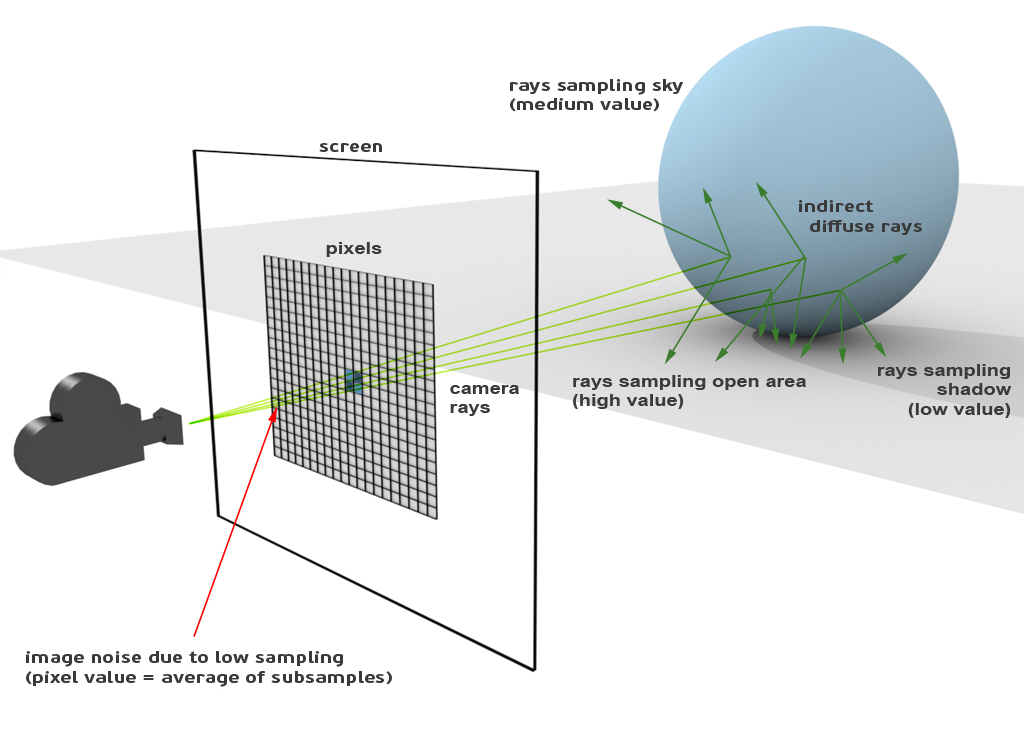
We want to calculate the lighting on the sphere, based on the surrounding area. Let’s imagine the sphere being surrounded by many objects, some of which have different and saturated colors. We then trace rays from the camera towards the sphere and for each point (sample) on the sphere we trace indirect diffuse rays. Those Indirect Rays are generated according to Montecarlo algorithms, thus, they are random. Those Indirect Rays also gather lighting information and return that to the current point (sample) that is seen on the screen.
So, for example, from a point on the sphere (called A), we create some indirect diffuse rays: some of them gather info from a red object, some gather info from a blue object and again, some other green info from a green object: the returned value to A is determined by the contribution of those colors.
Now, let’s consider another point nearby (called B), and trace some Indirect Diffuse Rays: if we use few rays and because they are random, they might gather more red than blue and return a color that is visibly a bit different from A. If adjacent values are not uniform we might encounter a problem called Sample Noise, that is due to low sampling: the final aspect of that region is the presence of grain. We don’t want that!
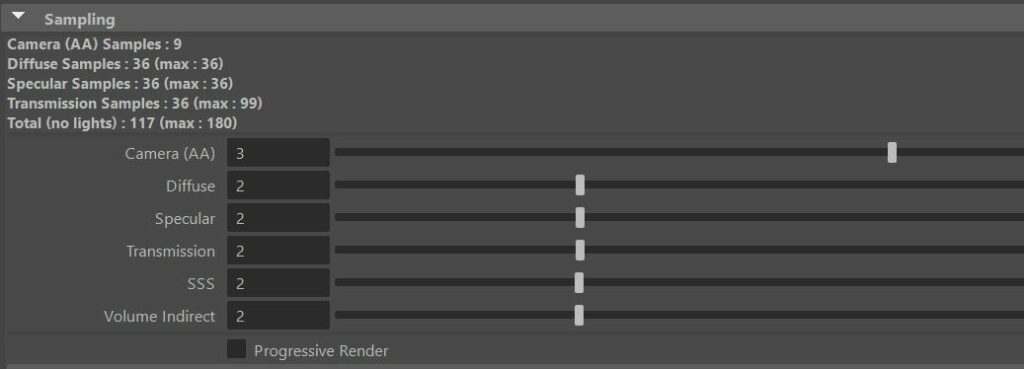
In order to avoid that noise, we have to increase the number of Diffuse Sample Rays for each point on the sphere. That way, we have more uniform lighting distribution as we gather more info from a point. In the Arnold interface there is a parameter called Diffuse Sample that manages the number of samples per point.
Let’s have a close look at the Sampling Interface. In the following setting, the value of 3 for the Camera (AA) means that every pixel is subdivided into 9 subpixel (3^2) that are our 9 camera rays directed towards the scene. Diffuse 2 means that for each intersection of camera rays with the geometry, we have 4 indirect diffuse rays (2^2), for a total of 36 rays per pixel (9 x 4).
As we can see, the algorithm is applied to subpixels that are our Camera samples, while the final color is calculated for the single pixel with anti aliasing techniques and filters. It’s wrong to compare a sample to a pixel, because a pixel is usually made of n samples. The reason is because we want to have cleaner renders without visible aliasing effects.
I hope that this sampling explanation is useful when you need to set up a scene. The other parameters like Specular, Transmission, SSS, etc.. follow the same logic as explained, but they depend on different rays like reflection, transmission, subsurface scattering, etc.
Also, lights have light samples which improve the aspect of direct specular reflections and the soft shadow quality. In the interface above, the total number of samples doesn’t include the light samples – Total (no lights). For a complete understanding, check out Arnold’s sampling documentation.
A few extra notes on Sampling:
- More samples means more quality, but also longer render times.
- The settings depend on the type of scene and materials that you are going to produce. If you have few reflective objects that are also positioned away from the camera, you can easily avoid increasing the option called Specular. Also, if you don’t have any translucent material, you can ignore the parameter called SSS.
- Arnold has a very interesting option called Adaptive Sampling by reducing or increasing the number of camera rays based on a threshold. Low threshold values mean more sensitivity to noise, thus more samples per pixel.
- In the latest version of Maya, you can also take advantage of the new Arnold GPU renderer. There is just the camera (AA) option enabled and everything is easier to use. The suggestion is to use the adaptive sampling too, with the setting reported in the official Arnold guide.
- In order to set the number of light bounces, use the Ray Depth rollout. The default setting is quite good for almost all the situations. In case you need to render an indoor scene with many details, the advice is to increase the number of diffuse, specular and transmission bounces. That will strongly improve the final quality.
Creating the Right Mood
Before lighting a 3D scene, I always think about the kind of result and mood I want to obtain. The atmosphere is quite important to communicate a sort of feeling. It’s not always easy to have a clear idea of the final results from the very beginning but there exists some common lighting schemes that come in handy. For instance, there is a scheme called One-Point Lighting, where the presence of a single key light on a subject, from a specific angle, makes the sense more dramatic.
On the other hand, there is another scheme called Three-Point Lighting where we always have the key light, a fill light to balance the darker areas, and a rim light which makes the edges of the character pop up from a background. These lighting schemes can be applied in different situations and they are usually found in portraits or scenes featuring characters.
There is also another type of lighting (Naturalistic Lighting) where the mood is determined by the nature (e.g. sky light) and the result can be improved by adding supporting light sources to create more contrast in certain areas or to communicate drama, to capture the attention of the viewer and so on.
There are no strict rules, but it’s always a good habit to start from simple lighting schemes and to incrementally improve the result. The goal is not just to follow schemes but also to communicate your feelings.
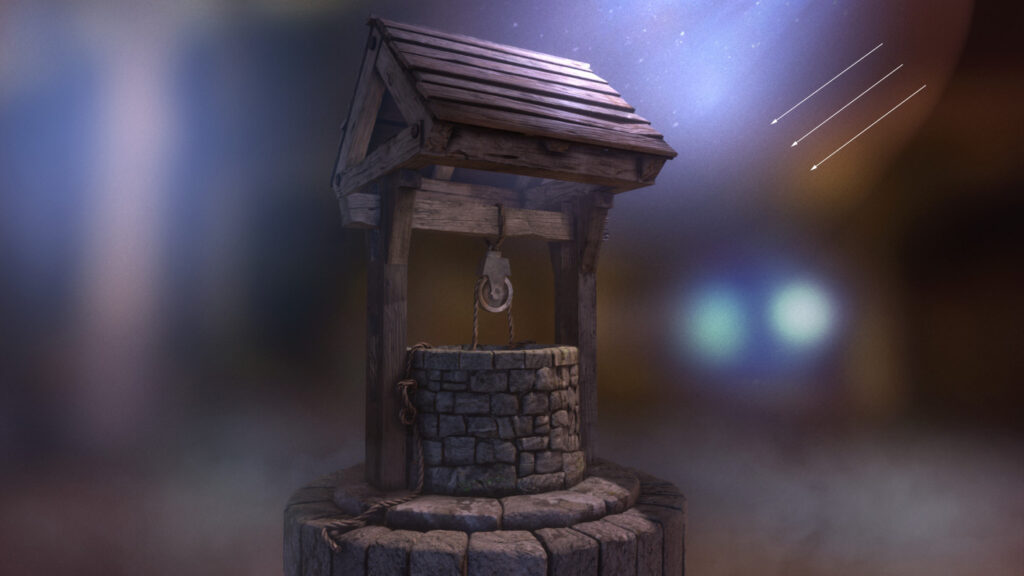
For example, here we can see a clear presence of a key light (coming from the top right), in order to create contrast with the rest of the scene, which is lit by a soft environment map. In this particular case, I started from a 360 HDR and then I decided to add the direction light (key light) and some post effects like volumetric lighting and fog presence at the lower part of the render.
The goal was to suggest something fantasy with a more medieval look. I only had the 3D model and not the 3D environment.
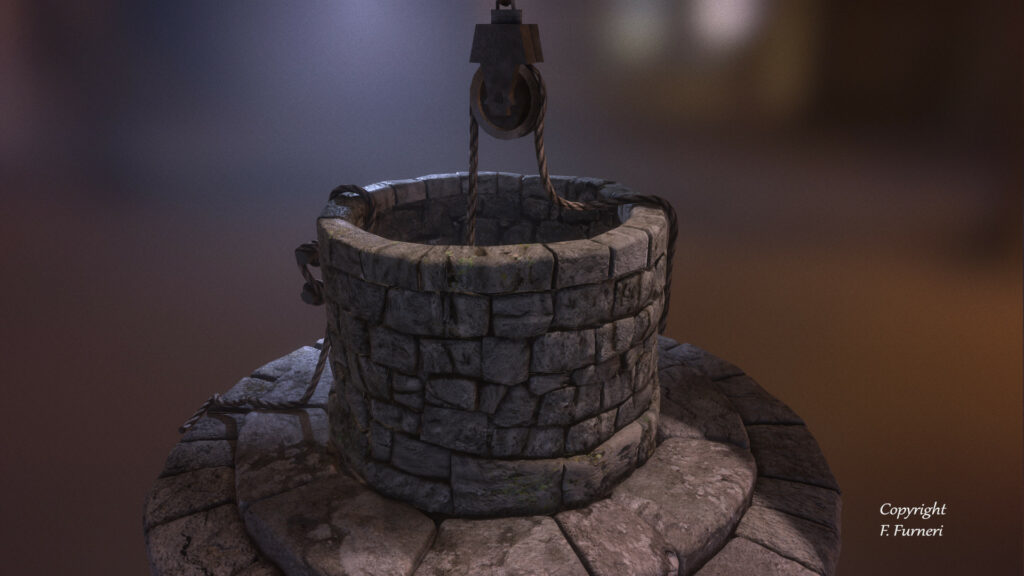
In this next render, I kept the same ambient lighting with the same environment map, but I added another light at the right to show the stone material details and a light from behind (cooler in terms of color), showing the circular structure of the well and creating a nice transition of color in the basement: from a warm to a cool hue and vice versa.
This lighting scheme has a front light, a fill light (environment) and a backlight that can be considered a sort of rim light.
Final Bits of Advice:
- Deepen the Sampling concept with more than just the camera AA and diffuse sample parameter, and try to understand the other type of rays (specular, transmission, SSS, etc..) and how to set them according to your scene.
- Study your 3D scene to have a thorough understanding over the use of the Ray Depth.
- Learn from the references to understand the mood. Many artists from the past use interesting lighting schemes (for instance, Rembrandt for his portraits).
- Don’t stop at simple lighting schemes. Remember that those are starting points that can be modified, enhanced, and enriched with your own lighting.
- Get used to Environment Maps like 360 HDR, for instance, because sometimes they can be useful to introduce ambient light and interesting reflections on your objects
- If you have time, try to experiment more renderers to understand the differences (e.g. Arnold, Marmoset, VRay, Redshift to name a few).
- The post processing can be helpful to improve the quality of your renders. If you already have a good quality render in your 3D package, you are already on the right track.
- To integrate your 3D model onto a real background, follow my simple advice and learn more on guides and online tutorials. It’s not hard to get used to, but it requires time and patience.
My name is Francesco Furneri and I’m a 3D artist with more than 10 years experience in 3D Computer Graphics. I specialize in 3D Modeling and Texturing and have worked for 3D companies as a modeler, technical artist, and texturing expert. I also freelance in the States, creating organic 3D models of characters and prop textures. I want to thank TurboSquid for giving me the possibility to share this article with you, and I really hope that you find this description useful for your ongoing projects. Check out my Artstation page, and feel free to contact me.


