
This list of QuickTips was compiled to help guide artists through a few of the most common issues we see when performing visual QA on content. Please take the time to familiarize yourself with each item on this list as the information here has been carefully tested to help elevate the quality and reliability of your work. Check back from time to time as we will continue to add to this list as time goes by.
In addition to these tips, you can also view some common fail points we often see.
1 General Settings
1.1 Color/Gamma
1.1.1 Be sure to set-up your computer monitor, Photoshop and 3DsMax correctly for accurate color. Learn more here.
1.2 Lighting
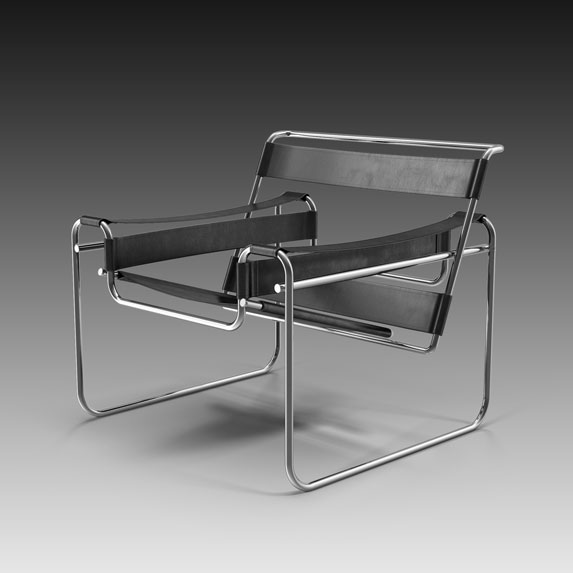
1.2.2 Don’t be afraid of shadows, not every object needs to be illuminated on every side and in every recess. The variations of shadow and highlight help give an object depth and dimension.
1.3 Lensing
1.3.1 Choosing the right lens can make a huge difference to the final render of an object. Going too wide (15mm) can make certain objects appear comical and going too long (200mm) can make certain object appear too flat and one dimensional. There are some classic photography guidelines to help you make an educated decision.
-
- Character/Portraits : 50mm – 80mm
- Cars : 50mm – 80mm
- Buildings : 24mm – 50mm
- Interiors : 15mm – 24mm
- Products (such as electronics) : 24mm – 80mm
- Food (such as fruit and vegetables) : 24mm – 50mm
*These are only suggestions since there may be times when you want to exaggerate the shape or scale of an object.
2 V-Ray Material Settings
2.1 Diffuse Settings
2.1.1 Most materials will benefit from some type of texture. It can be an image or a procedural (noise, dent, or even a falloff) but it’s rare that an object’s Diffuse color is a solid color.
2.1.2 When not using a texture for Diffuse color, consider using VRayColor for accurate gamma.
2.1.3 Diffuse color should never be below RGB 5 or above RGB 230. Nothing absorbs light 100% (except for a black hole perhaps) and nothing reflects light 100%.
2.1.4 However, the Diffuse color of most glass/clear liquid materials should usually be pure white since we don’t want any color corrupting the output. Instead, use Fog in the Refraction parameters to introduce color (see below 2.3.2).
2.1.5 The Diffuse color of most metal materials should be dark in order to keep them looking rich and contrasty. The metal material can use a small amount of color, but the RGB Value should usually be less than 50. In other words, If the metal has a colored reflection (such as gold) Then the color you want the gold to be should be plugged into the Reflection color and the Diffuse color should be a much darker version of that reflection color.
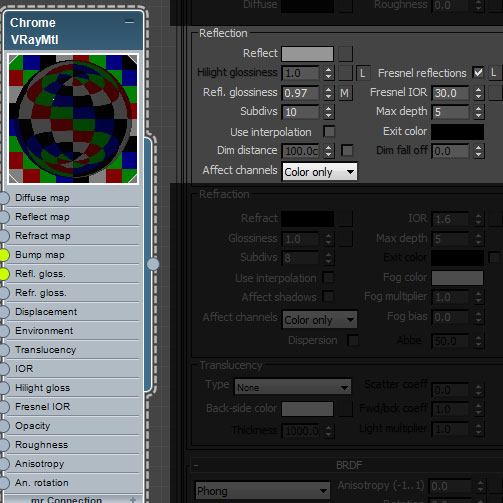
2.2 Reflection Settings
2.2.2 Always use Fresnel and try using these typical IOR settings:
-
- Water – 1.3
- Glass/Acrylic – 1.5-1.6
- Shiny plastics – 2.2-3
- Polished woods and paint – 3.2-5
- Dull Metals – 12-18
- Reflective metals – 25-40
2.2.3 Try unlocking the Reflection Fresnel IOR from the Refraction IOR to bump up reflection without affecting refraction. This can come in handy if you’re trying to make a transparent object object more reflective without affecting the amount of refractive IOR.
2.2.4 Be careful with the Reflective Glossiness settings. It’s rare that you’ll need to set it any lower than .6.
2.2.5 Try unlocking the Hilight glossiness and Reflection glossiness and giving the Hilight glossiness a value that is .1-.2 less than the Reflection glossiness. This is a great way to give bright highlights a realistic glow and soften the harshness of sharp highlights.
2.2.6 Try driving the Reflective glossiness values or Reflect color with a texture to add extra realism.
2.2 Refraction Settings
2.3.1 Try using these typical IOR settings:
-
- Water – 1.3
- Glass/Acrylic – 1.5-1.6
- Crystal – 2.0
- Diamond – 2.4
2.3.2 Adding a bit of Fog color can really help improve the look of glass and water. Try setting the Hue to the color you want, Set the Saturation to 128 and Value to 255. Then use the Fog Multiplier to adjust the effect.
2.3.3 Be sure to check Affect Shadows for refractive materials.
2.4 SSS
2.4.2 Experiment with the different presets of the VRayFastSSS2 material. They are almost always a good starting point for great looking SSS materials.
2.4.3 If you need more control of the Highlights/Reflections of a SSS material, try using a VRayBlendMtl with a standard VRayMtl as a coat.
2.5 BDRF
2.5.1 Usually you can leave the BRDF setting on Blinn, it works well for most realistic materials. Phong will give you a more plastic look (usually not favorable) and Ward is only good for some types of metals, though Ward can sometimes give unexpected results.
2.5.2 If you have a metal material that uses blurry reflections, consider playing with the Anisotropy settings to get more realistic highlights. Sometimes a subtle amount of anisotropy can elevate the realism of an object by introducing unexpected movement to the reflection.
2.6 Bump
2.6.2 Adding a small amount of bump can be a great way to break up the surface of an object and remove the usual plasticy look of a 3D material.

2.7 VRayBlendMtl
2.7.1 The VRayBlendMtl is a great way to add layers of realism to your materials. Just be sure that it’s being used only when needed since it can slow renders down considerably when used heavily or incorrectly.
What should I do next?
Before you submit we recommend that you checkout our list of common fail points. Reviewing this list will help you avoid any problems when you submit your model for review.


