
Material Settings
When setting up materials for StemCell there are some general setting that must always be used. These settings are necessary to maximize consistency and portability to other renderers. StemCell for Cinema 4D requires using the Physical renderer which is found in R13 and newer versions. Download the Calibration scene with example materials here, or below the example image.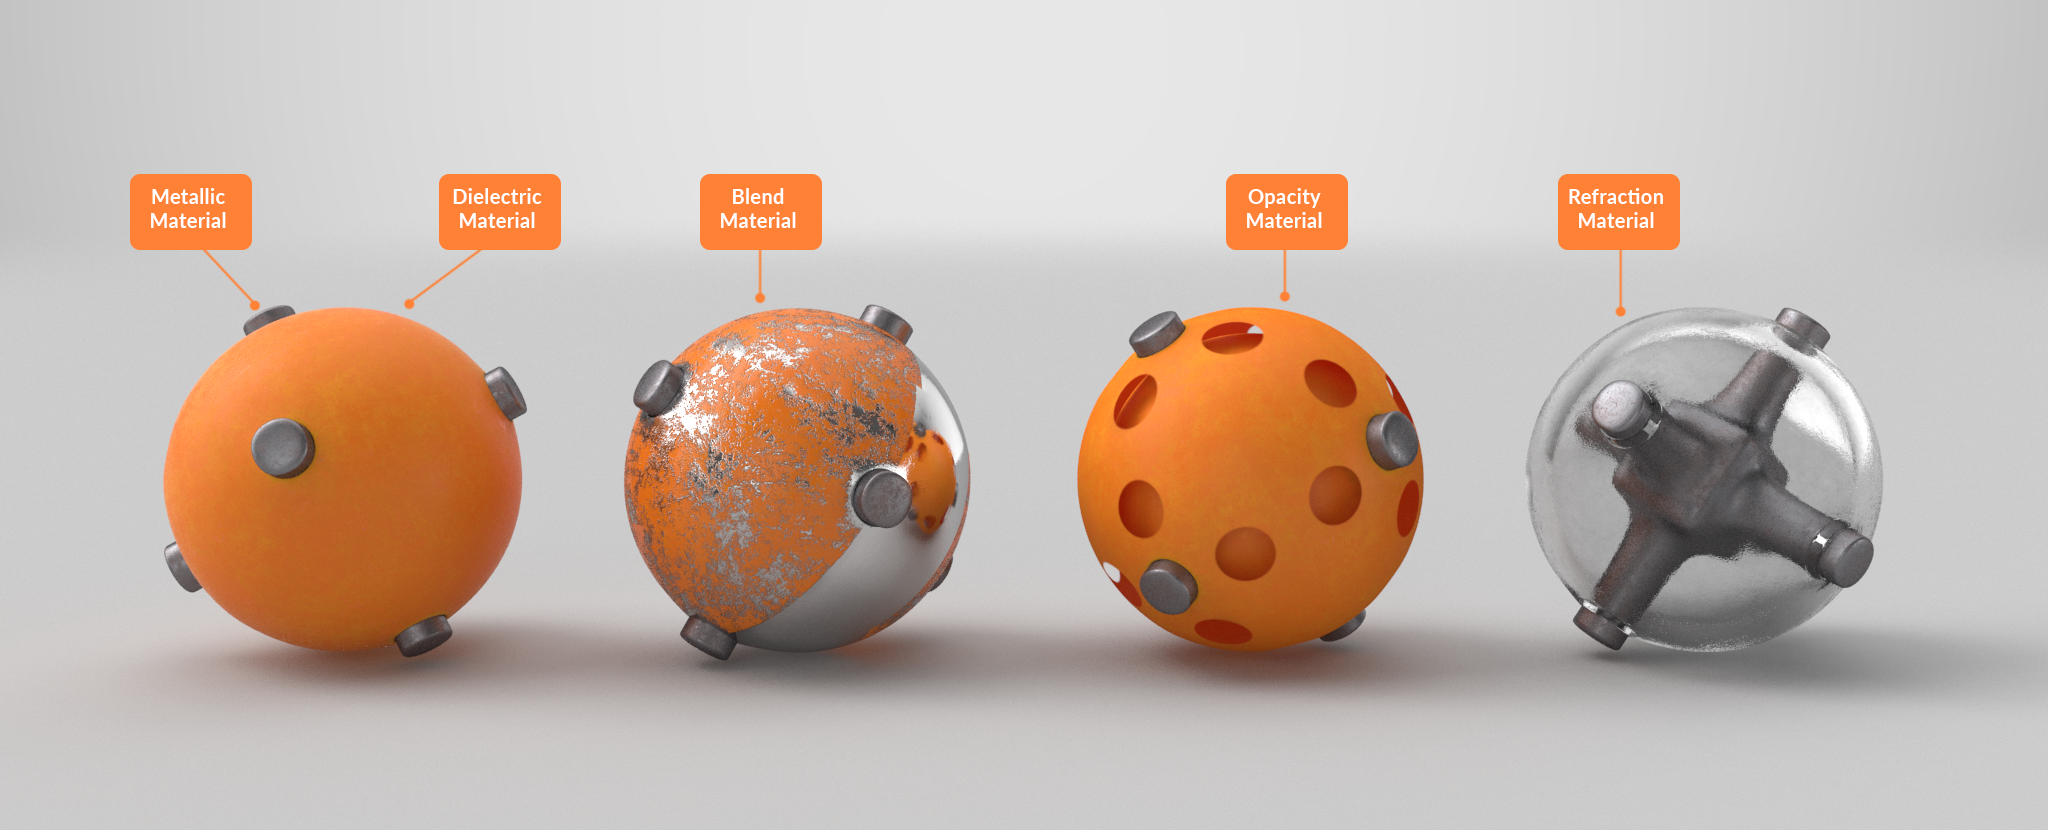 Download Material Example Calibration Scene for these five material examples.
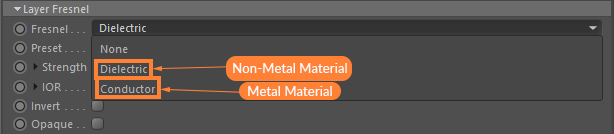
If your material is a non-metal, then set Fresnel type to Dielectric. If the material is metal, set Fresnel type to Conductor. Then set your IOR value accurate for the specified material type.
 Select IOR type based on the intended material being created.
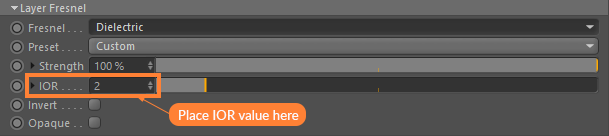 Index of Refraction value set for material.
All texture maps applied in C4D must have their Sampling switched to None in Shader properties.
 Sampling set to none for all texture maps.
The BRDF type in Cinema 4D is set under the Specular tab. Set Type to GGX and Attenuation to Maximum.
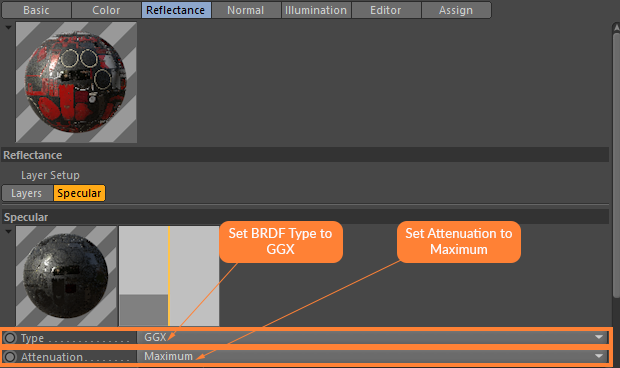 Specular Type set to GGX and Attenuation set to Maximum.
Additionally Roughness, Reflection Strength, Bump Strength, and Brightness all must be set to 100% while Specular Strength should be at 0%.
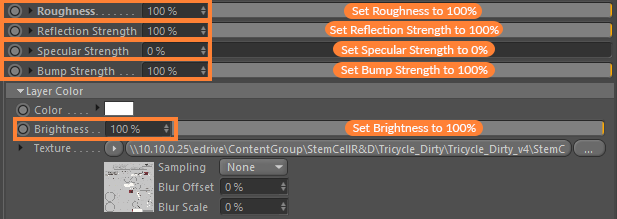 Additional Specular properties correctly.
If there is ever a time where a specific tab cannot be found in Cinema 4D, the tabs can be turned on under the Basic Tab by checking the corresponding box on.
 Additional Tabs can be activated from the Basic Tab.
Texture Map Settings
Texture maps must be applied to the right slots with the correct gamma. This section is a guide to correct material setup. You can also find the correct gamma types listed in the tables located in the Textures & Materials section of the StemCell 3D Modeling Specification.Plug the Diffuse map into the Texture slot underneath the Color tab. This is a sRGB map so Color Profile needs to be set to sRGB.
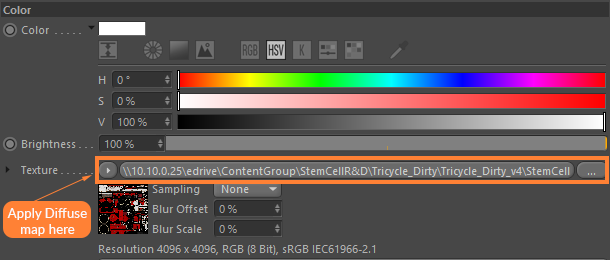 The Texture slot showing map is applied and in use for Color.
Color Value needs to be set to 100%. Be sure that Brightness is also 100%, also.
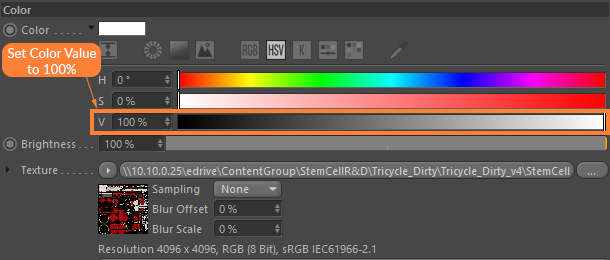 Color Value set to 100%.
The Specular map needs to be plugged into the Texture slot under Layer Color for Specular tab. This is a sRGB map so Color Profile needs to be set to sRGB.
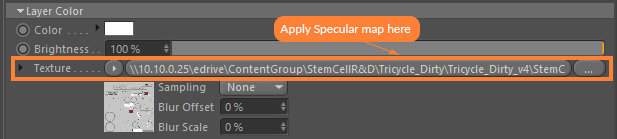 The Texture slot showing map is applied and in use for Specular.
If the model uses an Emissive map, this will be plugged into the Texture slot under the Luminance tab. This is a sRGB map so Color Profile needs to be set to sRGB.
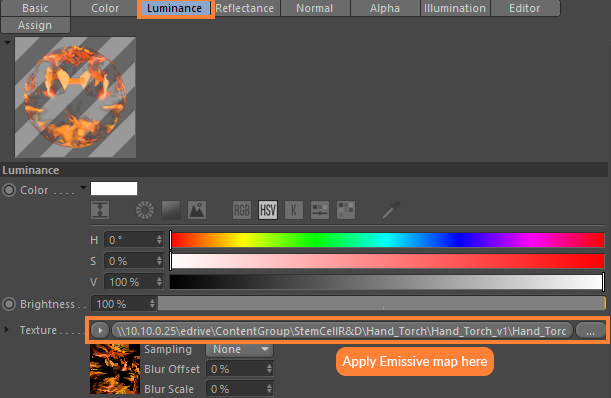 The Texture slot showing map is applied and in use for Luminance.
All sRGB texture maps need the Color Profile set to sRGB.
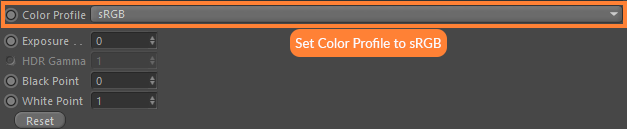 Color Profile on texture map set to sRGB.
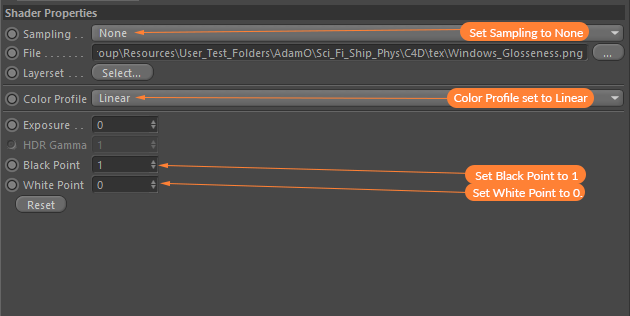
The Glossiness texture map is going to be plugged into the Roughness Texture slot. This is a linear map so Color Profile needs to be set to Linear. It will also need the values to be inverted after.
 The Texture slot showing map is applied and in use for Roughness.
Since a Glossiness map is used instead of Roughness, the white and black values need to be switched for this texture. Normally the White Point value would be set to 1 and the Black Point to 0, but for Glossiness, it is opposite. Set White Point value to 0 and Black Point value to 1.
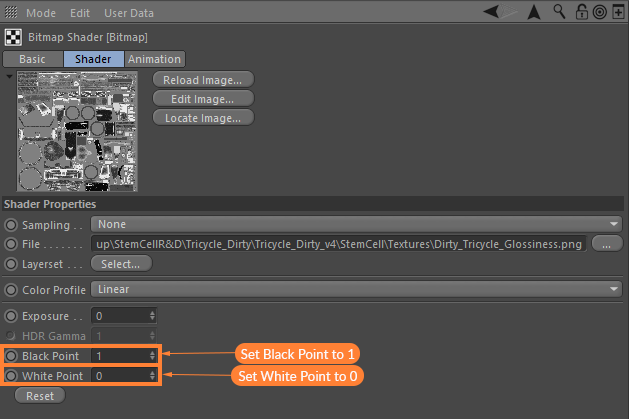 Values swapped for Black Point and White Point.
It’s important to note that Cinema 4D uses OpenGL Normals by default. When plugging DirectX Normal maps, required by StemCell, into Cinema 4D Flip Y (Green) needs to be checked on.
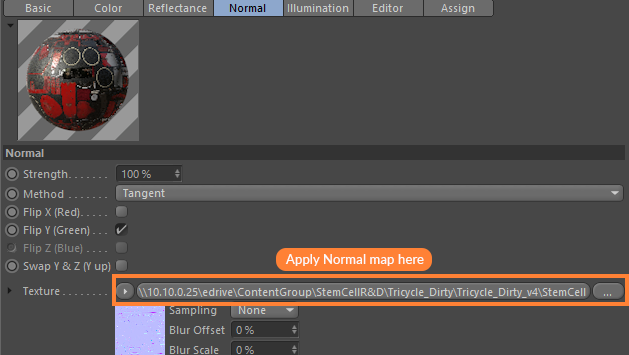 The Texture slot showing map is applied and in use for Normal.
When plugging in a Linear map make sure that Color Profile is set to “Linear”. This applies to the Glossiness, Normal, and Refraction Map.
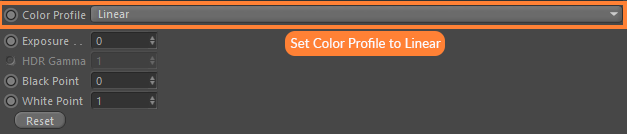 Color Profile set to “Linear”.
Transparent Materials
If transparent materials are present, they must follow the guidelines in How to setup Transparency & Opacity for StemCell.If the model uses an Opacity map, this will need to be plugged into the Texture slot found within the Alpha tab. The checkbox next to Soft needs to be selected. This is a sRGB map so Color Profile needs to be set to sRGB.
 The Texture slot showing map is applied and in use for Alpha and Soft is checked on.
If the material uses Refraction color, first thing you have to do is check on Transparency under the Basic Properties tab.
1. If creating a Refraction material, set your IOR value in the Refraction value slot.
2. If you are using a flat value, select a value from the Color slot. This color value should be Achromatic, meaning it possesses no hue information. The value used should be Black, White, or a varying shade of Grey.
3. In C4D flat values can be chosen by using either RGB or HSV. RGB is the standard format used in most applications.
4. If a texture map is being used, apply map to Texture Slot for Refraction. This map should also be Achromatic. This is a linear map so Color Profile needs to be set to Linear.
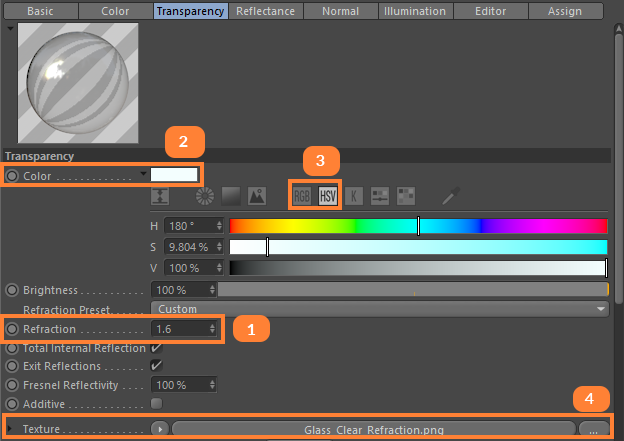 Image shows where to set Refraction parameters.
Make sure texture maps color profile is set to Linear and Sampling is set to none.
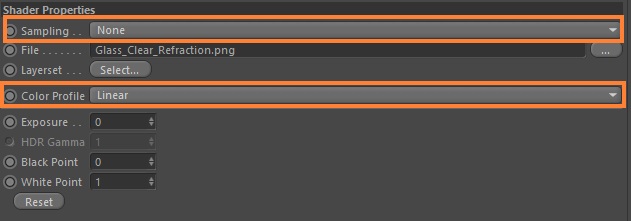 Color Profile set to linear and Sampling set to none.
Additionally, when using Refraction, the Glossiness map must be applied to the Roughness slot in Transparency settings under the Reflectance tab. Set the type to GGX. Roughness, Reflection Strength, and Bump Strength set to 100%.
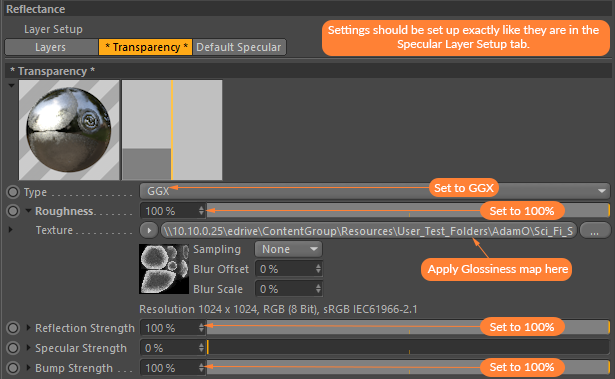 Glossiness map applied with correct settings for Transparency.
The Glossiness map Shader Properties will be set the same as normal. Sampling set to None. Color Profile set to Linear. Black Point set to 1 and White Point set to 0.
 Glossiness map applied with correct Shader Properties.
What if my texture map set has multiple material types?
There are some situations where a material may require a dielectric and metallic materials on the same surface. See When to use Blend Materials for more information on these situations.When an individual dielectric or metallic material can not be separated by object, that is the only time a blend material needs to be used. The Blend material is used to combine the 2 different IORs for dielectrics and metals. This way one material applied to the single object represents both surface types. A dielectric version of the material is created as Material 1 using correct low IOR value. A copy of that material is made for the metallic version as Material 2 with correct high IOR. The Metallic map is used as the Mask. There is not a traditional blend in Cinema 4D when compared to other DCC applications such as 3ds Max or Maya, so to achieve similar results, follow these instructions.
First apply the lower dielectric IOR to the object(s) requiring the blended material.
 Lower IOR Material applied to object.
Next, apply the higher IOR version of the material to the same object(s) requiring the blended material.
 Higher IOR Material applied to object.
To blend the two materials, the Metallic map is going to be applied to the Higher version of the material as an Alpha map using the same settings as if it were an Opacity map (see above). Color Profile set to sRGB and “Soft” checked on.
For Blended materials to work properly in Cinema 4D, the Metallic map needs to be very accurate as to what it depicts. Metals should be white or close to it, and dielectrics should be close to black.


